
Note: This post is part of a series. Each post builds on the previous ones. If you are just trying to add one thing to an existing system that was not built following this series, then I cannot promise that these instructions will work for you, although they probably will. If you’ve started from something other than a non-NOOBS Raspbian image, then you’ll probably need to adjust for that.
Please refer to the series Introduction for a list of all the different posts in the series.
Self-Promotion: I have recorded this series as a screencast for Pluralsight:
(http://www.pluralsight.com/courses/raspberry-pi-home-server)
If you have a Pluralsight subscription, please consider watching it. Reading the instructions is one thing, but watching it done demystifies the whole process.
Thank you!
Getting Started
The first thing any computer needs is an operating system. There are several Linux distributions (distros) to choose from. You can think of a distribution as an “Edition” of Linux. Just like Windows comes in Home, Business, and Enterprise editions (or whatever they’re called this week), each Linux distribution consists of the same core OS “kernel”, but with different combinations of additional features added. In the Linux world, these “features” could include things like the entire windowing system, so the differences between distros are a little more drastic than Windows editions, but you get the point.
In this series we’ll be building on top of Raspbian, which is a Raspberry Pi variation of the Debian Linux distribution. It is available from the Raspberry Pi Foundation’s download page as an image file.
Note: At this point, you can follow the directions at the Raspberry Pi Foundation’s own help pages. The tutorial there is very complete, and has videos to explain the process in greater detail than I’ll be going into here. In the interest of being complete, I’m going to summarize the instructions here as part of the series.
Prerequisites
- A Raspberry Pi, power supply, etc.
- An HDMI or composite monitor, keyboard, and a mouse (optional)
- A wired network connection
- An SD card of at least 8GB. If you plan to boot from a hard drive, as covered later in the series, then you don’t need anything bigger than this.
Create the SD card
Go to the Raspberry Pi Foundation’s download page, and get the current Raspbian image. You can download this directly, or you can save the foundation some bandwidth costs and download via BitTorrent.
Get a copy of Win32DiskImager or HDD Raw Copy, and use that to write the image file to your SD card. These days I prefer HDD Raw Copy because it can create compressed backups of an SD card in one step.
More detailed instructions for multiple operating systems are available from the Raspberry Pi Foundation’s site. When you’re done, eject or “safely remove” the SD card from your computer.
First Boot
Hook the Raspberry Pi up to your monitor, network, keyboard, and mouse. Insert the SD card you prepared above. Finally, plug the power supply into the Raspberry Pi. You’ll see a screen with some Raspberries in the top-left corner, and some text beneath them.

Pretty quickly, the whole screen will be replaced by a splash screen like this.

The splash screen is new as of the 2016/09/23 release, and gives us some useful information about the version of the OS in the lower-right corner, as well as a kind of one-at-a-time series of status messages in the lower left. After a while, this screen will be replaced with the Desktop.

Your wallpaper may be different than mine depending on the release you’ve installed. Also, if you don’t like the image, you can always change it. Use the “Appearance” application under Start -> Preferences -> Appearance Settings. You could right-click the desktop and choose preferences from there, but that’s actually a separate, older program, and your wallpaper won’t carry over to the login screen. Using the Appearance application will keep everything in sync. If you want your old Raspberry logo wallpaper back, you can find it at /usr/share/raspberrypi-artwork/raspberry-pi-logo-small.png
Update All the Things
Before you start getting moved in, you should update the software that’s on the Pi so far. Depending on how long it’s been since your image file was created, many of the pre-installed programs may have already released updates and/or bug fixes. Lets get them all up to date. This is easily done from the command line.
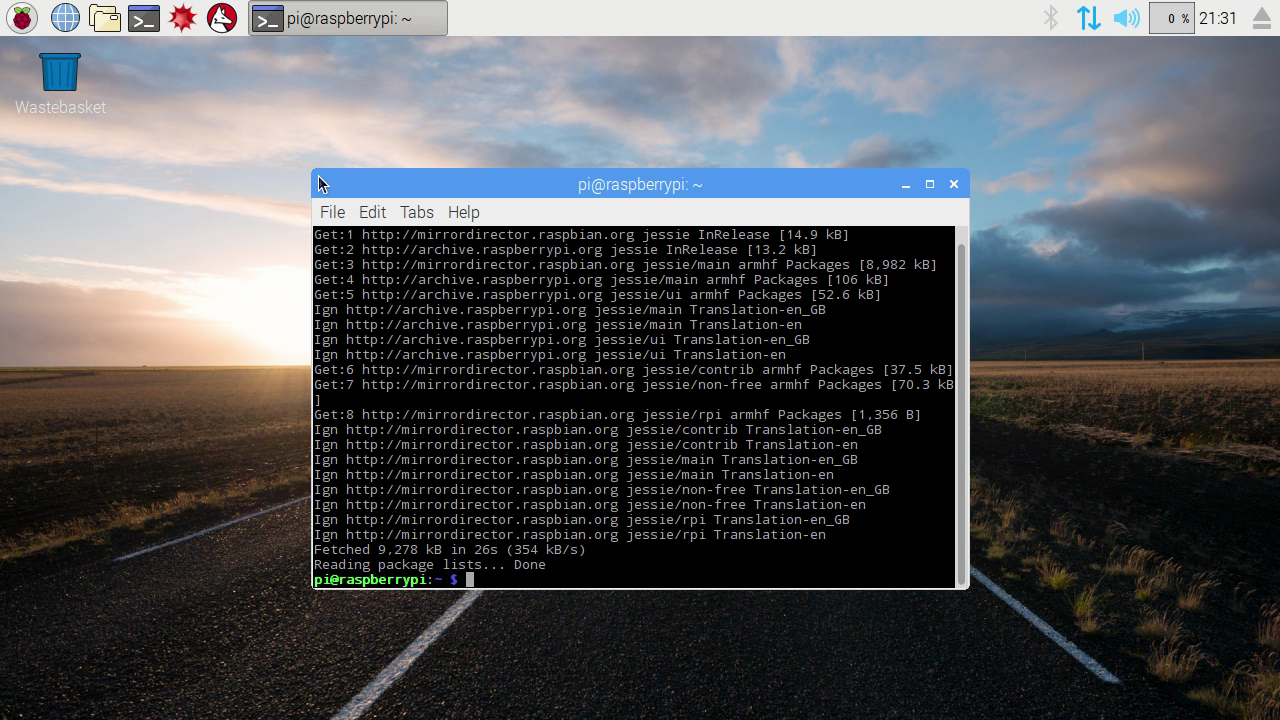
We’re going to use APT to update the installed software. APT stands for “Advanced Packaging Tool”. APT is actually a suite of different tools, but the one we’ll be concerned with the most is apt-get, and its job is to install and maintain software packages along with any other packages that they depend on. Throughout this series, we’ll use apt-get to install nearly everything we need.
Open a command prompt by clicking on the Menu button in the top-left corner of the screen, then hover over “Accessories”, and then click on “Terminal”. You should see a black window with a prompt in it like this:

Note: The Terminal program is also available from the toolbar at the top of the screen. In my screenshot above, it’s the fourth icon from the left, including the menu button itself.
The first apt-get command we’ll use tells apt-get to update its list of available software packages by downloading fresh lists of packages from a variety of sources over the internet. It’s important to do this first so that apt-get has an accurate picture of what the most recent version of each package is. Even if your OS image was made fresh yesterday, the software packages included in it are being constantly and independently updated on their own schedules.
At the prompt, type the following:
sudo apt-get update
Wait for this command to complete. Depending on the speed of your Pi, and the speed of your internet connection, this might take a few minutes. When you’re done, it should look something like this:
The next command, “upgrade” tells apt-get to take the version information it just retrieved using the update command, and figure out what changes to make in order to bring everything up to date. Even if the image you just burned was released this morning, many of the packages it contains may have been updated since the image was locked down for release.
Note: This is actually an ideal time to take a side-trip to the supplemental post “Trimming the Fat”. You may want to go read and complete that task before continuing in order to prevent upgrading a lot of packages you won’t even end up using.
sudo apt-get upgrade -y
The “-y” tells apt-get not to stop and ask before continuing. Without the “-y”, apt-get would list out the proposed changes, and ask you to confirm them before actually making any changes. Again, depending on how long it has been since your OS image was created, this step might take a while. My upgrade took quite a long time. Be patient, it’s worth it.
Some of these changes will require a reboot before they become effective, so we’ll do that now. You can do this from the desktop menu, but since we’re already at a command prompt, let’s just do it from there.
sudo reboot
Once the system has rebooted, it’s time to start configuring and customizing the Pi. Click the Menu button in the top left, and select Preferences -> Raspberry Pi Configuration.
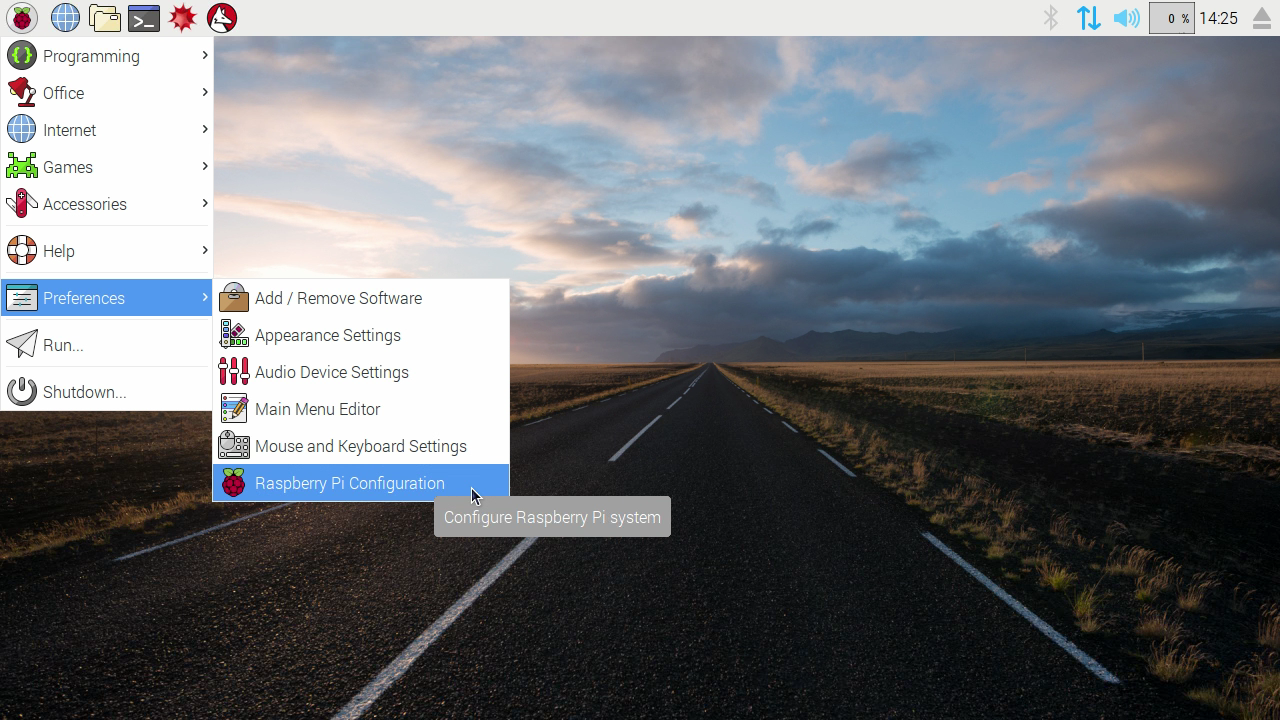
This will open a modern, graphical, and more convenient version of the command-line “raspi-config” program that we used in the past. This program allows you to make changes to the configuration of the OS itself, and certain hardware settings. We’ll use it to start “moving in” to the fresh OS.
Expand Filesystem
OS Image files are typically shrunken down to their bare minimum in order to take up less room, so if you put a 4GB image on a 16GB SD card, you’ll need to expand the file system to get the other 12GB of space on the card back. As of the 2016-09-23 release, this resizing should be done automatically the first time you boot the system, but we’ll do it just to be sure, and also because this behavior could possibly change in later releases.
Click on the “Expand Filesystem” button, and you should see a confirmation dialog like this.

Click OK to dismiss the dialog. We won’t be rebooting the server just yet, though. We’ll finish the initial configuration first, and then reboot when we’re done.
Before we set the rest of the system options, and especially before setting a password, let’s make sure the localization settings are right, otherwise you may have trouble with the password, especially if your password contains special characters. Certain key combinations on the default British English keyboard may not match your preferred settings, and you might not be able to get in if you don’t do this first. For instance, if I hit the backslash key on my keyboard right now, it will type the # character instead. You can see how this would be a problem if I wanted a backslash in my password.
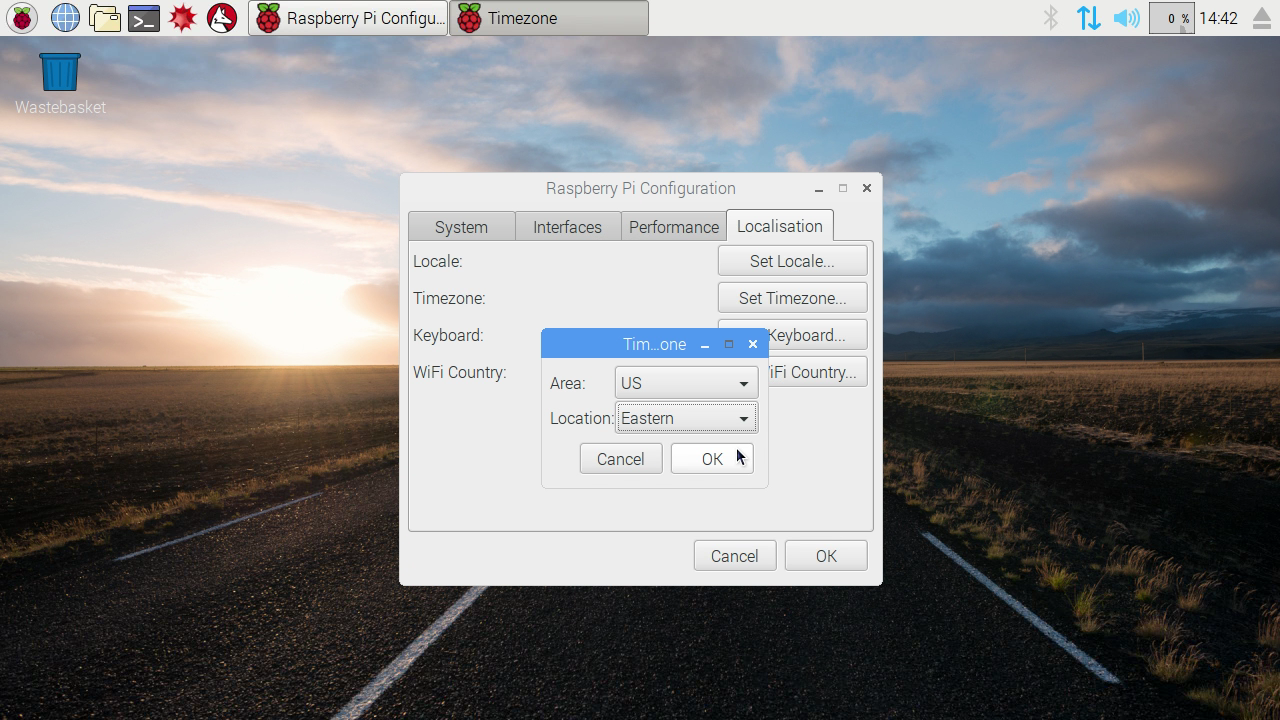
Localization Options
The last tab is for setting various language and keyboard options. Click the “Locale” button, and change the drop-downs in the resulting dialog to match where you live. I live in the United States, so my settings look like this:

Next, set your time zone. The Pi doesn’t have a battery-backed clock onboard, so it needs to sync up with an internet time server every time it boots up. It needs to know its location in order to get the offset correct.
Next, you’ll need to tell the Pi what kind of keyboard layout you’re using. If you don’t set this up correctly, you’ll find that some of the keys on your keyboard won’t work the way you expect. I’m using a US layout keyboard, so my settings look like this:
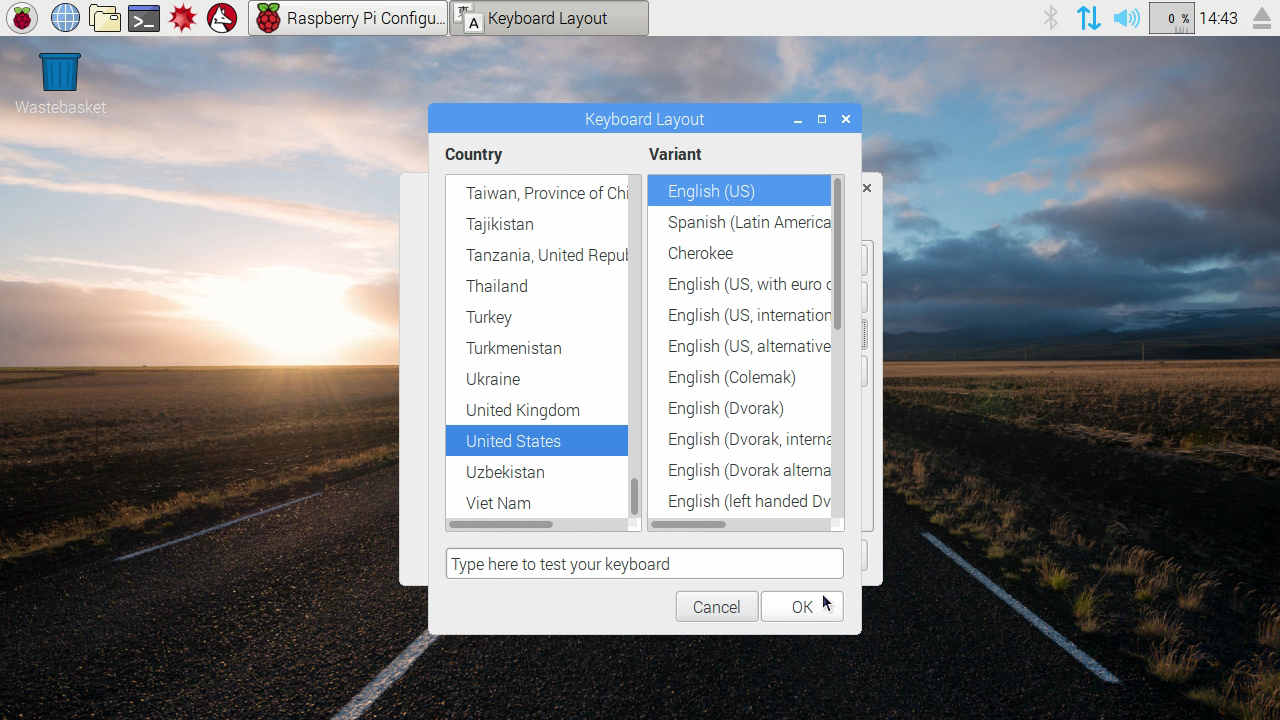
Type your intended password in the box, just to make sure it comes out the way you intended, and then click OK to dismiss the Keyboard Layout dialog.
There’s one last option on the Localization tab, and that’s “Wi-Fi Country”. This was added after the release of the Raspberry Pi 3, which has on-board Wi-Fi. If you plan to use the on-board Wi-Fi, then you’ll need to set up a country for that as well since the standards vary slightly from country to country. I don’t recommend running a server over Wi-Fi if you can help it, but the option is there if you need it.
Now head back to the “System” tab, and we’ll pick up where we left off.
Change password
By default, the Raspbian OS defines a user named “pi”, which we’ll be using to do all of the configuration and setup in this series. The pi user’s default password is “raspberry”, but since “pi” is an all-powerful administrative user, you’ll want it to have a different password than everyone else’s, right? Click the “Change Password” button, and enter the default password once and your new password twice in the dialog.
Important: If you’re planning to use any “special characters” in your password, make sure you’re gotten the keyboard localization squared away before changing your password. In fact, open up the text editor (Menu -> Accessories -> Text Editor) and try typing your password there first, just to make sure it comes out the way you intended. Not all the keys map to the same symbols on the different keyboard mappings.
Note: You may or may not be prompted for the current password, depending on the specific image you burned. In this screenshot, I was not prompted for the existing password.

Other “System” options.
There are several other options that can be set up on the “System” tab of the configuration dialog. Let’s walk through them one at a time.
By default, every Raspberry Pi is named “raspberrypi”. Since you may end up with multiple Pis on your home network, you will need a way to tell them apart. Fill in a new name for your server in the “Hostname” box. I call my own server “RPHS”. You are, of course, free to call yours whatever you want, but you’ll need to adjust configuration settings accordingly later on in this series.
The Raspberry Pi Home Server will spend most of its life disconnected from any kind of monitor, so there’s no need to boot to the desktop every time the machine starts up. A Raspberry Pi 2 or 3 has plenty of horsepower though, and booting to the desktop makes it much easier to “remote into” the server later on for maintenance, so I’m going to leave my Pi booting to the desktop for now. You can always change this setting later on if you like. Just remember that when future articles tell you to type a command, you’ll need to do that from the Terminal.
You can continue to let the Pi automatically log in as the “pi” user if you want, but since this is a server you should probably disable this option. There usually won’t be anyone using the Pi directly anyway. Uncheck the “Login as user ‘pi'” option to tell the Pi to prompt for a name and password rather than just logging in automatically.
Out of the box, the Pi will try to boot as fast as possible, without waiting for the network connection to be complete. A server isn’t much use without a network, so it’s probably better to tell the Pi to wait for the network connection to come up before continuing. Check the “Wait for network” checkbox to tell the Pi to wait until it has established a network connection before performing most of its boot-up routine.
The Underscan setting won’t affect anything once the Pi is no longer attached to a monitor, but I have disabled it in order to get better looking screenshots. If the image on your monitor has black bars all the way around it, then you might want to try toggling this setting and see if you like the resulting image better. If not, you can always set it back again.
That’s everything you need on the “System” tab. The end result should look something like this:

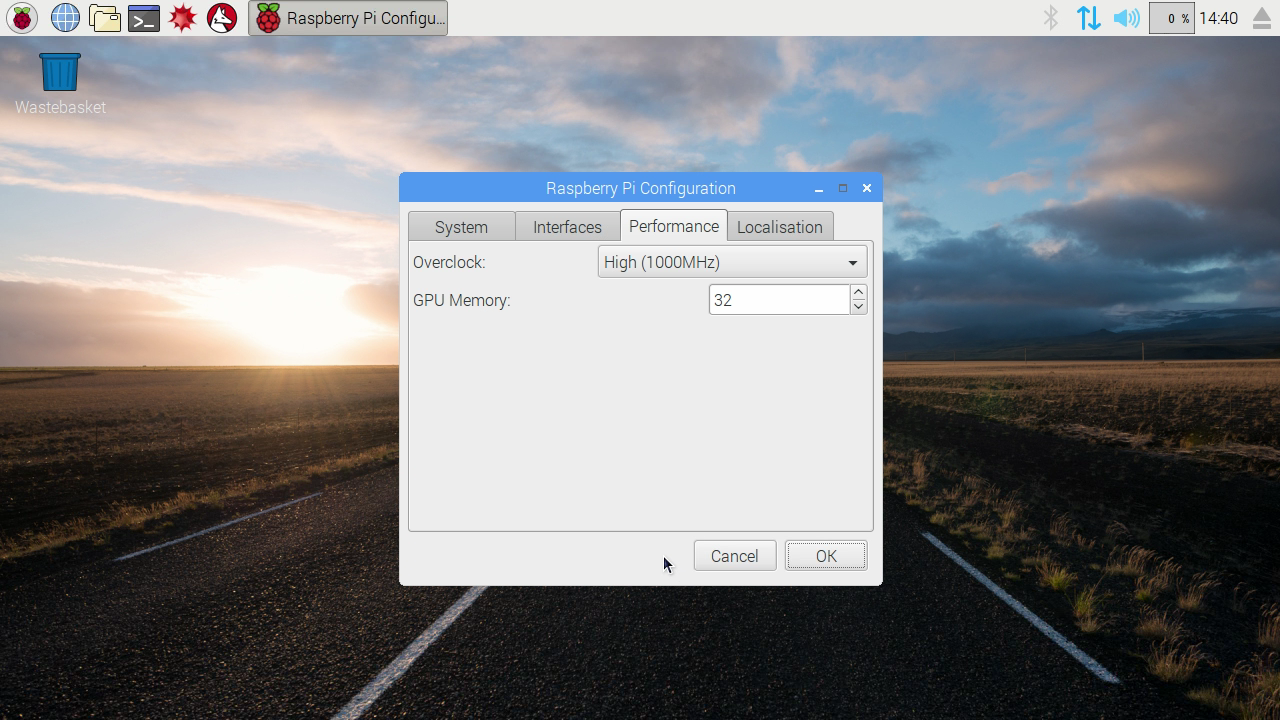
Performance Options
There are only two settings on the Performance tab. The “Overclock” setting lets you squeeze a little more speed out of your system.
CAUTION: The ability to overclock varies from board to board, and is affected by your power supply as well. If you are using some old leftover cell-phone charger you happen to have lying around in a drawer, this may not work for you. If you’ve invested extra money in a high-quality power supply, you’ll probably have better luck. Until you know how your particular combination of components will behave, it’s probably safest to leave it running at its default. You can always come back and change it later on, once you have everything stabilized.
My particular board and power supply have proven themselves to be a reliable pair, so I’m going to turn it up to the maximum of 1000 MHz. I’ve also turned the “GPU Memory” down to 32 since I don’t plan to use the graphical desktop very often. In fact, after this initial configuration, the only part of this course that will require the desktop is CrashPlan. I could probably go even lower than 32, but this setting has worked well for me.
Note: If you’re using a Pi 3 or Zero, then the overclocking option will be grayed out and unavailable.
Interfaces
Starting with the November 2016 release of Raspbian, SSH has been disabled by default in an effort to tighten security. If you’re intending to go headless and connect remotely, you might want to turn SSH back on. If you think you’re only going to use the full remote desktop, then you can leave SSH turned off. It’s up to you, but I always enable SSH and give the Pi user a new password.
If you want to be able to use the remote desktop functionality, then make sure you enable VNC. We’ll come back to this in a later post.
Finished
Click the “OK” button on the Configuration dialog, and you’ll be prompted to reboot the system:

Click “Yes” to reboot the Raspberry Pi and apply the new settings.
Second Boot
When the Raspberry Pi reboots this time, it will be ready to use. It doesn’t have a lot of programs installed so far, but it’s a starting point. If you disabled “Logon as user ‘pi'” like you should have, then you’ll need to type the user’s password when prompted.
If you disabled booting to the desktop, then you should see a login prompt similar to this:
RPHS login:
Log in using the user name “pi”, and the password you set up earlier, or “raspberry” if you skipped that step… which you shouldn’t have.
A Quick Primer on “sudo”
In a Linux system, the main administrative user is called “root”, and root can do pretty much anything it wants, no questions asked. The “pi” user is a specially-privileged account, capable of doing things an ordinary user account can’t, but it isn’t as all-powerful as root.
You’ll see the command “sudo” used a lot in this series. It stands for “substitute user do”, and lets you run other commands as if you were a different user. If you don’t specify a particular user to impersonate, the “root” user is assumed. Only user accounts that have been specifically allowed can perform actions as the root user. The pi user is one of those accounts. Using “sudo”, the pi user can perform individual actions as if it were root.
Unlike the Windows world, which occasionally displays a “User Account Control” (UAC) prompt to make sure you really mean it before letting you do something potentially dangerous, Linux systems take a different approach, and require you to say up-front that you know what you’re doing by running those potentially dangerous commands as root by using the sudo command.
You could also log in as root, or give “pi” root privileges, but that’s way more dangerous. The use of “sudo” acts to stop you from doing dangerous things without at least acknowledging that you know they are dangerous.
Wrapping up
You’ve reached the first major milestone. The Raspberry Pi is now a fully-functioning computer. It has been localized, personalized, and brought up to date with the latest software releases. Now is the ideal time to take a backup.
Shut down the Raspberry Pi “politely” by using the menu, or with the following command at a terminal window.
sudo shutdown –h now
This tells the compute to shut down “hard”, and to do it immediately. There are a few different shutdown options, including the ability to schedule a shutdown for a specified time and date in the future. This is the command you’ll use most often, though. After the screen turns off, wait a few more seconds for the Raspberry Pi to finish up any last-minute tasks, make sure all the lights have stopped blinking, unplug the power, and transfer the SD card to your regular computer.
You can use any number of different programs to create a backup. The first, and most common, is Win32DiskImager. This is the program used earlier to write the Raspbian OS image to the SD card in the first place. Use Win32 Disk Imager, “Read” the contents of the SD card into a backup file for safekeeping.

I have been using a different program lately called HDD Raw Copy. It functions a lot like Win32DiskImager, but has the ability to compress the resulting image file as it goes. The raw image files created by Win32DiskImager are the full size of the SD card being backed up, even though the SD card contains a lot of empty space right now. A compressed image file will be much smaller, allowing you to keep more of them around.
I personally keep backups of each step in this build process so that when something changes or breaks, and I’m trying to update this series for my readers, I can jump right to the step I need. If you only intend to keep around one recent backup for safety, then compressing it won’t help you nearly as much as it helps me.
The steps for using HDD Raw Copy are pretty similar to Win32DiskImager. First, select the source of the data to be backed up. That would be your SD card.
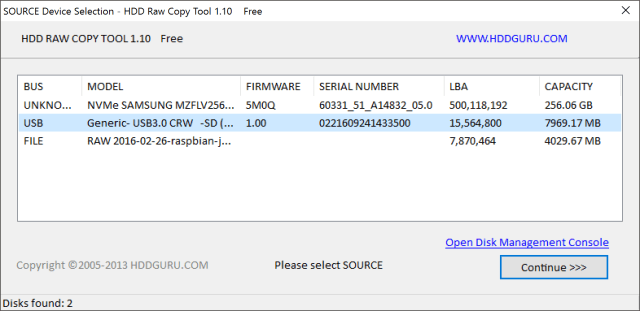
Click the “Continue” button, and select the destination for the backup. This would be a file somewhere on your hard drive. Double-click the “FILE” option from the list, and pick somewhere to put the file.

Make sure to pick “Compressed Image” from the “Save as type” drop-down to save space. HDD Raw Copy can create raw .img files just like Win32DiskImager, but my 8GB card was backed up into an image that’s only 4GB.
Click “Continue” again to get to the next screen which will show a summary of the proposed backup operation. This is your last chance to double-check the settings. Once you are satisfied, click “Start” and wait for the backup to complete. When it is finished, exit HDD Raw Copy, eject the SD card, and return it to your Raspberry Pi.
I’ll recommend making these checkpoint saves after pretty much each post in this series. You can refer back to this post for the instructions if needed.
What’s next?
In the next post, we’ll configure the network so that your Pi stays put, allowing you to find and connect to it later on.

Pingback: Raspberry Pi Home Server v2: Meet the Raspberry Pi | MelGrubb.ToBlog()
Hello and thank you for this thorough tutorial, it is really helpful!
I just ran sudo apt-get update, and then sudo apt-get upgrade -y, where it said: Need to get 10.0 MB of archives, which I did.
Then I immediately ran sudo apt-get update and sudo apt-get upgrade -y again, and then it said: Need to get 66.3 MB of archives, which I did.
I guess upgrading some programs triggers the possibility to upgrade additional programs? Maybe it’s good to include in the tutorial to repeat these two steps until no updates are available anymore.
I’ve had to make two passes before, but only rarely, and I never quite figured out a pattern to it. I can add that as general advice somewhere. Maybe the first time it comes up in the series.
That sounds perfect! Thank you for all this work and I hope I can help you by pointing out some more improvements while I work my way through your guide.
Another small remark: when I ran “sudo rpi-update”, I got the response “command not found”, and I found that I should first run “sudo apt-get install rpi-update”.
I think this is because I am not using Raspbian Jessie but Raspbian Jessie Lite, since I want to use my Raspberry Pi headless (as a Nextcloud server), and I read this can save a lot of resources, which makes sense. (And I guess Jessie includes rpi-update by default, and Jessie Lite doesn’t?)
Since your guide is meant to be at an appropriate level for a beginner (like me), maybe you can include in this post the existence of Jessie Lite and what consequences this will have for the rest of this guide? I will walk through your entire guide using Jessie Lite, and any issues I encounter I will share.
When making the compressed backup image, it is my understanding that the HDD Raw Copy tool is backing up the entire SD card (i.e.: both the Used and Unused file space). If that SD card has ever been used for any other purpose (such as a digital camera), then it has lots of data written in the “Unused” storage spaces that doesn’t compress very well. I think there is a command to zero-out (that is, write zeroes into) all the unused file spaces on the SD card before doing the image. Then the resulting image will be MUCH more compressible.
Yes, HDD Raw Copy copies the entire card/drive bit for bit, so its compressability will depend on how empty it is. This is also part of the reason I use smaller, 8GB cards for all of my builds. Since tools like HDD Raw Copy and Win32DiskImager will read every single bit whether it’s used or not, having fewer bits to begin with makes the backup faster.
As for fully erasing the card, yes, I’m sure there’s are many different utilities for that. Any kind of secure erase utility will do the trick. You could put the SD card in an adapter, blow away its partition table, add a single new partition, and then do a “slow” format in order to zero it out. Also, SdFormatter on Windows may have an option for blanking out the card. I’ll have to have a look.
I found the command that I was thinking of. After mounting the partition and changing to the directory where it is mounted do this:
sudo dd if=/dev/zero of=delete bs=1M
It creates a file called “delete” with all of the “unused” space, and fills it with all zeroes. When it is done, just delete the “delete” file to get the space back. Now do your compressed backup.
There is also a command to shrink the filesystem size. It’s the opposite of expanding, and creates an image containing only the important parts. I don’t have it off the top of my head, but I could look it up if needed. You would typically do this as part of preparing a new uncompressed image to send someone else. I’m pretty sure it’s how they make the official Raspbian images. I just build on an 8GB card to begin with, so my images are already pretty small.
I’m following your excellent instructions to rebuild my nas using my new Pi B+ and a 7″ touch screen.
There have been some improvements in the Pi image, which you might want reference. In particular, the file expansion and update functions are automatic on first boot.
In addition, there is a SD card copy function in the Accessories folder. I plugged in an 8gb USB flash drive, and just copy to it after each major step. Reboots thus only necessary as required to put changes into effect.