
Note: Just as with the main CrashPlan article, the CrashPi is not currently operational, but I’m leaving the article here in hopes that maybe the next update to CrashPlan won’t break things quite so completely.
In Part 15 of the Raspberry Pi Home Server series, I mentioned the possibility of building a “CrashPi”, a simplified version of the full server running only CrashPlan, and some basic supporting functions such as X11VNC for maintenance. I hadn’t actually built one, though. It was just an idea… until now.
Today, I’m introducing a dedicated CrashPi into my home network. The original idea of the CrashPi was for it to be placed at a friend or relative’s house to act as my off-site backup, keeping the home videos, photos, and documents safe in case of a disaster like a house fire. I hadn’t quite gotten around to asking to mooch from the in-laws broadband, though.
Then, just last week, my wife suggested that I could just put it in the garage, which is not attached to our house. The odds of the house and the garage being lost in anything short of a meteor strike are pretty low, so I’ve decided to build a real CrashPi, and to use CrashPlan’s “friend codes” to act as a true off-site backup for my college-age twins, who are now off on their own. No matter where they go now, the CrashPi in my garage is their secure backup.
Gathering the parts
I have a few older Raspberry Pis sitting around since the 2s came out, so I’m going to use my old B+, which has more RAM than my original B. This extra memory will be very helpful for CrashPlan, which can be rather resource hungry. Offloading CrashPlan to a separate server means that my main home server will have less to do now, which will also help with its stability.
The complete list of parts is as follows (with Amazon links):
- Raspberry Pi Model B+ (http://amzn.to/24K2Fiz)
- Power Supply (http://amzn.to/1p93m58)
- 8GB Micro SD card (http://amzn.to/1p93kKu)
- TP-Link TL-WN722N WiFi adapter (http://amzn.to/21TlD40)
- CyberPower SX550G UPS (http://amzn.to/1pt06RO)
- 5TB Seagate “Expansion” drive (http://amzn.to/1pt04cN)
- BUD Industries NBF-32018 ABS NEMA Enclosure (http://amzn.to/1pt0aRs)
- C14 Power Inlet (http://amzn.to/1pt09NE)
- Panel-mount USB cable (http://amzn.to/1pt0fol)
- Powered USB Hub (http://amzn.to/21TmbXG or similar)
- Adhesive anchors (http://amzn.to/1p94SE5)
Note: Not all the items actually came from Amazon. Most of the parts (hubs, power supplies, cables, WiFi dongle, etc.) came from my local MicroCenter, but not everyone has a toy store like that close to their house, so I’m providing Amazon links so you can at least see the parts I’m talking about. My hub is actually made by Inland, but Amazon doesn’t carry it, so I picked something similar.
The Pi, power supply, and SD card I already had on hand. The other items I bought new for this project. I have a smaller WiFi adapter (Tenda W311M) that I’ve used inside the house, but wanted a little more range to reach the garage, so I sprung for the dual band. I know how Pis hate having their power yanked, so I picked up another $45 UPS to keep things maintenance-free. The hard drive was the biggest expense on this project. All together, it came to a little over $200, but I think it will be worth it to keep the whole family’s stuff safe, and especially the kids. One has already had a laptop stolen and lost all of her work for the semester up to that point, so the cost seemed worth it to me.
I won’t repeat all the individual steps here, but I’ll refer back to the original posts, and explain any differences.
Install the OS
I installed the OS as usual using the current Raspbian image (not NOOBS). I left the overclocking off this time, favoring stability over performance for the CrashPi. I didn’t add any additional users, either.
Going Headless
Next, I set everything up for headless operation, installing Webmin and X11VNC exactly the same way as I did for the main server.
Attaching a Hard Drive
I attached the hard drive, mounted it at “/mnt/backups”, and created a “public” share through Samba. I did not, however, choose to boot from the hard drive in this case. I did set up a 1GB swap file on the external drive, and configured the Pi to use that for swap space rather than the file on the SD card. This will prolong the life of the SD card. I opted for NTFS as the file system again so that I can easily attach the drive to my regular computer if needed. “ext4” is still your best choice for performance and reduced overhead, though.
CrashPlan
Of course, the whole point of this project is to run CrashPlan, so that went on next, with the backups going to “/mnt/backups/crashplan”. I have signed into CrashPlan using the same credentials as my regular computer and Raspberry Pi Home Server. I signed each of the kids up with their own accounts, though, and used the friend code from the CrashPi instance to use as a destination.
It’s important to note that the friend codes are installation-specific, so the code from the CrashPi is different than the code from my regular computer or the existing server. Using the friend code from the CrashPi means that my kids have the ability to backup to the CrashPi, and only the CrashPi, so I don’t need to worry about them using up all of my primary server’s space.
Also, since each kid has their own account, they get their own notification emails about how up-to-date their backups are, rather than all of the emails going to me. Using their own accounts also means that their stuff is safe from prying eyes, even mine. They own the encryption of their individual backups, not me. The downside is that if they forget the password to their CrashPlan account, I can’t help them and they’ll have to start all over again.
NUT
Finally, I installed NUT, and configured the CrashPi to shut itself down in the event of a power failure. I didn’t set up email notifications about power events or anything like that because my main home server is already telling me about those.
Building the enclosure
Here’s where the project starts to become its own thing. I ordered the BUD box from Amazon based on it’s interior dimensions. It’s a bit deeper than I had anticipated, but that worked out well as it allows me to simply lay the hard drive down on the bottom of the enclosure rather than mounting it to the back of the box as I originally had in mind.
A metal box would have let me mount a bare hard drive directly to it, and would have acted as a heat sink, but I went with a plastic box so as not to interfere with the wireless signal. A metal box would have required an external WiFi antenna. I tried to build a system with as little custom fabrication as possible so that all the pieces can be easily swapped out if needed.
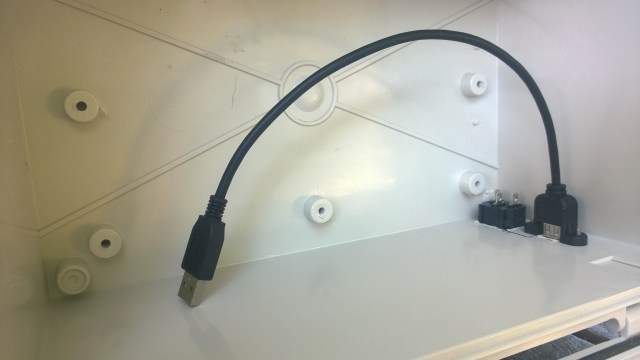
I could have run cords out of a simple hole in the box, but since this computer will be mounted in my dusty garage, I wanted to leave no holes where dust or spiders could get in and mess things up. For that reason, I wanted to keep the number of holes to a minimum (zero). I got the power inlet and panel-mount USB port so that once they were in place, I could seal around the openings with some RTV sealant I already had around. This should keep everything clean, and keep any insects out.
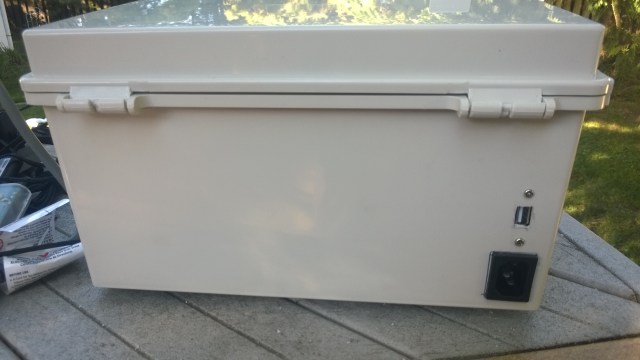
I cut most of the cord off of a small, three-outlet power strip (from Big Lots), soldered the leads directly to the power inlet, and enclosed the joints with some heat-shrink tubing. Then I mounted all the components to their respective walls using tie-wraps and adhesive anchors. The end result looks like this:
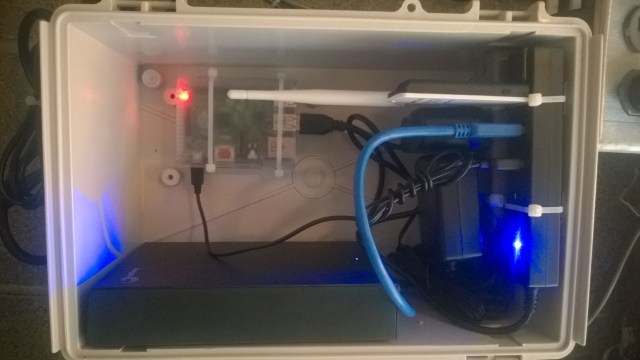
On the right is the USB hub and power strip (behind the hub). On the back of the box is the Pi itself, and just resting on the bottom of the box is the drive. There’s still room in this box for me to add another drive or two if needed, so I should be set for quite a while.
As you can see, the Pi is powered by its own hub. The hub is plugged into one of the Pi’s regular USB ports, but the Pi’s own power cord plugs right back into the hub again. You might not expect it, but this works just fine because the micro-USB jack on the Pi doesn’t even use the data lines, it only uses the power lines. You don’t have to worry about the Pi “talking to itself” or anything.
The drive I chose has its own power supply, but luckily it’s been implemented properly and doesn’t “back-power” the hub (and thereby the Pi), so when I turn the hub off, the whole system goes down. Naturally, I log in remotely and “sudo shutdown -h now” first.
Finally, here’s a picture of the whole thing mounted to the wall in my garage:
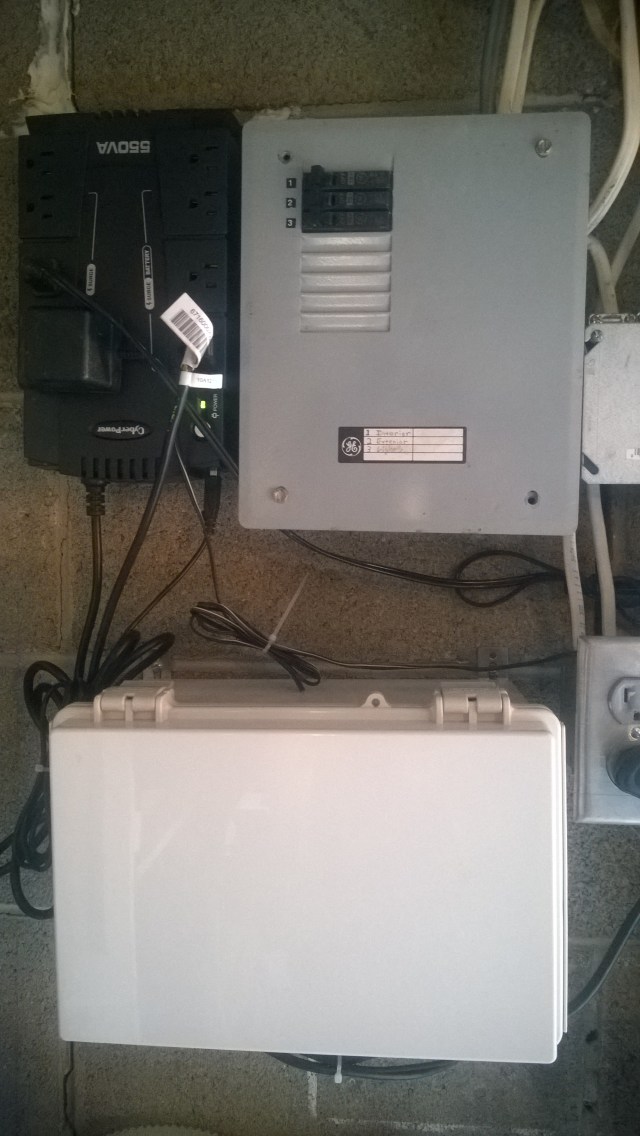
The single cord coming from the right side of the UPS (The battery-backed side) is running everything in the server box. The USB cable coming from the bottom of the UPS runs to the panel-mount USB port, which is then plugged directly into the Pi internally. The two plugs on the left have nothing to do with the server. They are for a couple tool chargers, and the UPS just provided a convenient, surge-protected place to plug them in.
It’s not the world’s most attractive “server rack” for sure, but it’s weather-proof and kind of off-site. It’s now the destination for all of my backups, including backing up the data from my regular Raspberry Pi Home Server. I’ve set up CrashPlan on my server to back up it’s drive full of stuff (Media, mostly) to the CrashPi, so now I have a redundant backup of all of the family photos, videos, and music. These were already stored on a two-drive RAID, but now they’re even better protected in the event of a disaster.

nice information….
I really enjoyed this article and almost have a completely working version of the CrashPi (I’ve been working on it when I get time). One question I have is that you mentioned that you didn’t put the whole OS over on the attached hard drive but instead configured a 1GB swap file. Your page from the home server series about adding a hard drive doesn’t go into enough detail so I was hoping that when you have some time you could write up the steps you took to accomplish this. Thanks.
I’ll try to update the post when I can, but I’ll have to walk through it all again myself to make sure I don’t miss anything. The basic gist is this, though. Since the CrashPi’s hard drive is for its sole use, and isn’t intended to be detached and plugged into a desktop computer like the home server’s drive might, I went with ext4 for the entire drive. Then, I edited /etc/dphys-swapfile, increased the size of the swap file, and relocated it.
CONF_SWAPSIZE=2048
CONF_SWAPFILE=/mnt/data/swap/swapfile
I don’t remember off the top of my head whether I had to create the file ahead of time or not, but you can stop and restart the swap process like this:
dphys-swapfile setup
dphys-swapfile swapon
Then, check on your swap configuration with
swapon -s
Or something like that. I don’t have it in front of me at the moment, so I may not have that totally right, but after some quick googling, this sounds right. If you DO boot from the hard drive, then changing the swap file location is unnecessary because it’s already on the hard drive, and the goal is just to get it off the SD card.
Thanks! I got it working.
Pingback: Raspberry Pi Home Server v2: Syncthing | MelGrubb.ToBlog()