
Note: This post is part of a series. Each post builds on the previous ones. If you are just trying to add one thing to an existing system that was not built following this series, then I cannot promise that these instructions will work for you, although they probably will. If you’ve started from something other than a non-NOOBS Raspbian image, then you’ll probably need to adjust for that.
Please refer to the series Introduction for a list of all the different posts in the series.
Self-Promotion: I have recorded this series as a screencast for Pluralsight:
(http://www.pluralsight.com/courses/raspberry-pi-home-server)
If you have a Pluralsight subscription, please consider watching it. Reading the instructions is one thing, but watching it done demystifies the whole process.
Thank you!
Update – Replacing Expired Signing Keys
Apparently, the Resilio signing keys have a habit of expiring every December. You’ll first notice it when you go to do an apt-get update, and receive an error that says something like “EXPKEYSIG 05CD43032484414B Resilio, Inc.”.
Take note of the signature. That’s the seemingly random string of letters and numbers in the error message. You’ll want to remove the old signing key because apt-get is going to go on complaining about it forever if you don’t. You’ll still be able to update Resilio Sync with a new key, which we’ll install in a moment, but unless you clear out the old one, you can expect to keep seeing the error.
Fortunately this is easy to do. Copy down the key signature from the error message, and substitute it in the following comment. In my case, it was “05CD43032484414B”, so the command to clear it out is:
sudo apt-key del 05CD43032484414BNext, you’ll need to install an up-to-date signing key before apt will be happy again. You can install the new key in exactly the same way you installed it originally.
wget -qO - https://linux-packages.resilio.com/resilio-sync/key.asc | sudo apt-key add -
That’s it. You can keep Resilio Sync up to date again… until the next time their key expires… sometime next December.
Introduction
There are plenty of cloud sync solutions out there. You have Microsoft’s OneDrive, Google Drive, DropBox, and SpiderOak just to name a few. One thing they all have in common is that a copy of your stuff is on someone else’s system. Perhaps you’re uncomfortable with that, even if they’ve promised that they won’t peek at it. Or maybe you’re just looking for yet another thing for your Raspberry Pi to do.
The same people that brought you BitTorrent, the peer-to-peer file sharing application, have created Resilio Sync (formerly BitTorrent Sync). It’s a file synchronization application based on the BitTorrent protocol. Think of it as a peer-to-peer network where all of the peers belong to you (Your desktop, laptop, tablet, phone, etc). If you put something in a sync folder on one computer, it shows up in the sync folder on all of the other computers.
The trouble is that in order for a file to travel from one computer to another, they both have to be up and running at the same time so that they can talk to each other. You may want to share files between work and home, but by the time you get to work, your home computer will have fallen asleep and vice versa. What you need is a node in your network that’s always on. The Raspberry Pi can be that node.
This post is going to be pretty short because, to be honest, the installation is dead simple.
Note: You may want to check out the Syncthing post in this series as well. Look at both options and decide which you like better. It seems that running both Resilio Sync and Syncthing at the same time works just fine, but you probably won’t need both.
Install Resilio Sync
There is an apt-get package available for Resilio sync, but it’s not listed on the well-known public repositories yet, so we’ll need to edit apt-get’s list of sources to add the new repository.
As with some of the other posts, we’re going to create a separate file to contain the sources needed for Resilio Sync. This is the preferred way to keep everything organized so you don’t lose track of which source was added to support which package. This new file must be in the /etc/apt/sources.list.d folder, and must have the extension .list. Name the file something that lets others know what package it was created to support.
Although the product’s official name has changed from “BitTorrent Sync” to “Resilio Sync”, the package name is still “btsync”. Since the previous version of this post was published, an official package has been released. Create a new APT source file using nano.
sudo nano /etc/apt/sources.list.d/btsync.list
Add the following line to the file. This will let APT know where to get the files it needs to install. If you followed the previous version of this article, and already have a btsync.list file, make sure you clear out any existing entries so that this is the only line in the file.
deb http://linux-packages.getsync.com/btsync/deb btsync non-free
Close and save the file (ctrl-x, y, enter).
You’ll need to import the signing key used by the new repository before you can use apt-get to install things from it. This time, the key is available from a public key server, so the commands are going to be quite different.
Import the repository’s signing key with the following commands:
sudo apt-get install apt-transport-https
wget -qO - https://linux-packages.resilio.com/resilio-sync/key.asc | sudo apt-key add -
Note: You may already have https support for apt-get installed as part of installing other components, in which case the first command won’t find anything to do, but I’m including it here just to be sure.
Now you can update apt-get’s list of available packages to take the new repository into account and install BitTorrent Sync the same as any other software package in this series.
sudo apt-get update
sudo apt-get install btsync
That’s it, BitTorrent Sync is installed, and should already be started automatically. You can check on the status of the service like any other daemon.
sudo service btsync status
All configuration is done using the web interface, but you can’t see it yet. At the time I’m writing this, btsync will only show its web interface to the local computer, meaning we’ll need to either hook the Pi up to a monitor, or connect via the remote desktop using VNC.
This is good for security, and you might consider leaving it this way if you don’t mind opening up a VNC window whenever you want to make changes. If you’d prefer the convenience of connecting from any computer in the house, then you can make a small configuration change to allow for that. Open btsync’s configuration file using nano.
sudo nano /etc/btsync/config.json
In the “webui” section, change the “listen” value from “127.0.0.1:8888” to “0.0.0.0:8888”, and then restart the btsync service.
sudo service btsync restart
Configuring BitTorrent Sync
The rest of the configuration will be done from the browser. If you left the web interface locked down, then you’ll need to open the browser on the Pi’s desktop, and go to “localhost:8888”. If you opened it up, then you can use a browser on your regular computer and go to “http://rphs:8888”, substituting the name of your server.
You’ll get a prompt to name this instance.

Once again, I’ll call mine RPHS. Dismiss the dialog, and you’ll be taken to the main Sync interface. You can start adding folders to sync, but first we should address some security concerns. If you left btsync configured to only work directly from the Pi, then this isn’t as much of an issue, but if you set it to be accessible from any computer on the network, then you’ll want to give the admin user a password.
Click on the gear icon in the upper-right, and then “Preferences”
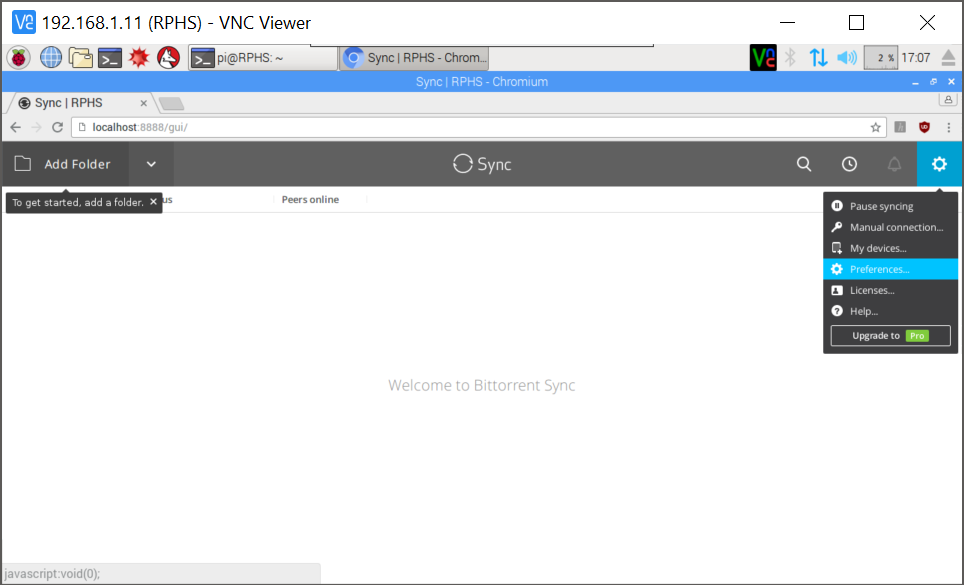
Next, go to the Login tab, and fill your new password in twice.
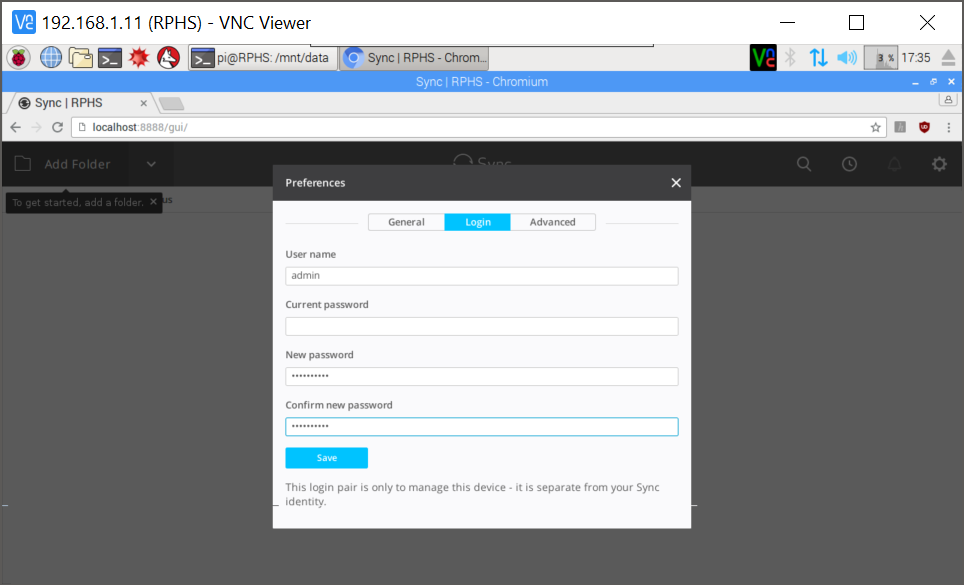
Since you just changed the admin password, your existing browser session is no longer trusted, so you should be prompted immediately to re-authenticate.

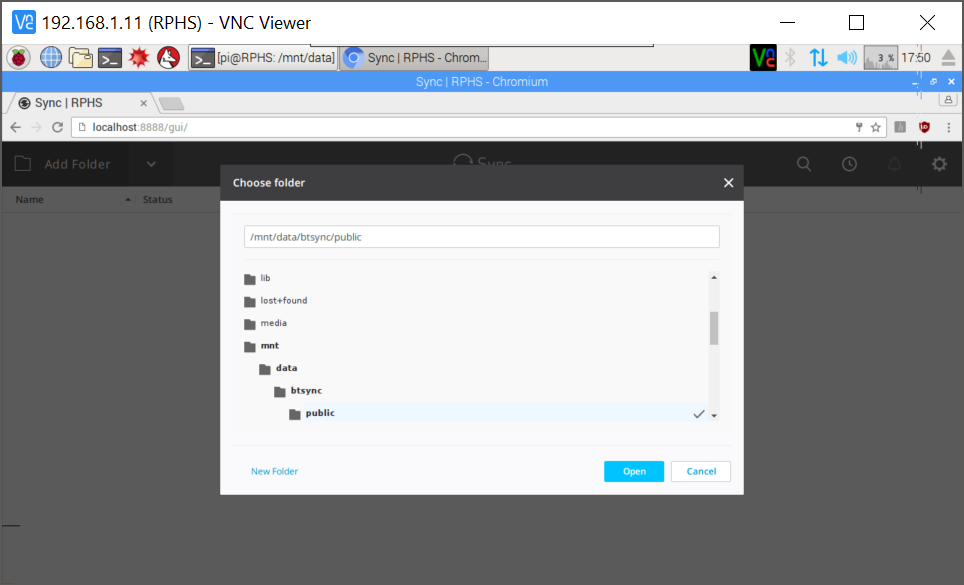
Type the user name “admin” and your new password to continue”. Next, go back to the General tab, and lets make sure that btsync is storing our stuff on the hard drive, not on the tiny SD card. Click on the Change button next to the “Default folder location” button, and choose a new location for your stuff. This could be inside the public share if you want. I’m going to put mine in a new top-level folder outside the public share. You can create this folder yourself, or let btsync do it for you from the dialog. Close the configuration dialog when you’re done.
At the “Link Devices” page, you have a decision to make. If you’re already using Sync 2.0 on other computers, then click “Link a device already running Sync 2.0”, and follow the prompts to link up with your existing devices. I’ll be setting this device up as my first, so I’ll click “This is my first Sync 2.0 device”.

Choose a name for this btsync instance. I usually name mine after the computer I’m installing it on, so I’ll call mine “RPHS”.
Creating a Sync folder
Click on the “Add Folder” link in the upper-left to create your first Sync folder. The browser window will open. Navigate your way to the folder you wish to synchronize, or click the “New Folder” link in the lower left of the dialog to create a new folder. I’ve created a “public” folder inside the btsync folder.
In the next dialog, you get to set permissions for this share. Since this is my public share (at least to those I share the key with), I will choose “Read & Write”, and leave the other options alone.

Now, click on the “Copy” button in the lower-right, and copy out the text from the dialog. You’ll need this to set up the other computers that will sync to this folder. Close the copy dialog, and then the share dialog to return to the main btsync interface.
Set up other computers
Now that we’ve created a sync folder on the Pi, we just need to install BitTorrent Sync on another computer, and start syncing. BitTorrent Sync clients exist for Windows, Mac, Linux (obviously), and all major mobile platforms. Instructions for installing and configuring the clients will vary by platform, so I won’t cover them all here, but they should all be straightforward.
For this demo, I’ve installed BitTorrent Sync on my main Windows 10 computer. From the main menu, click “Enter a key or link”.

You’ll be prompted for the key that identifies the folder on another computer (the Pi) that you want to synchronize with.
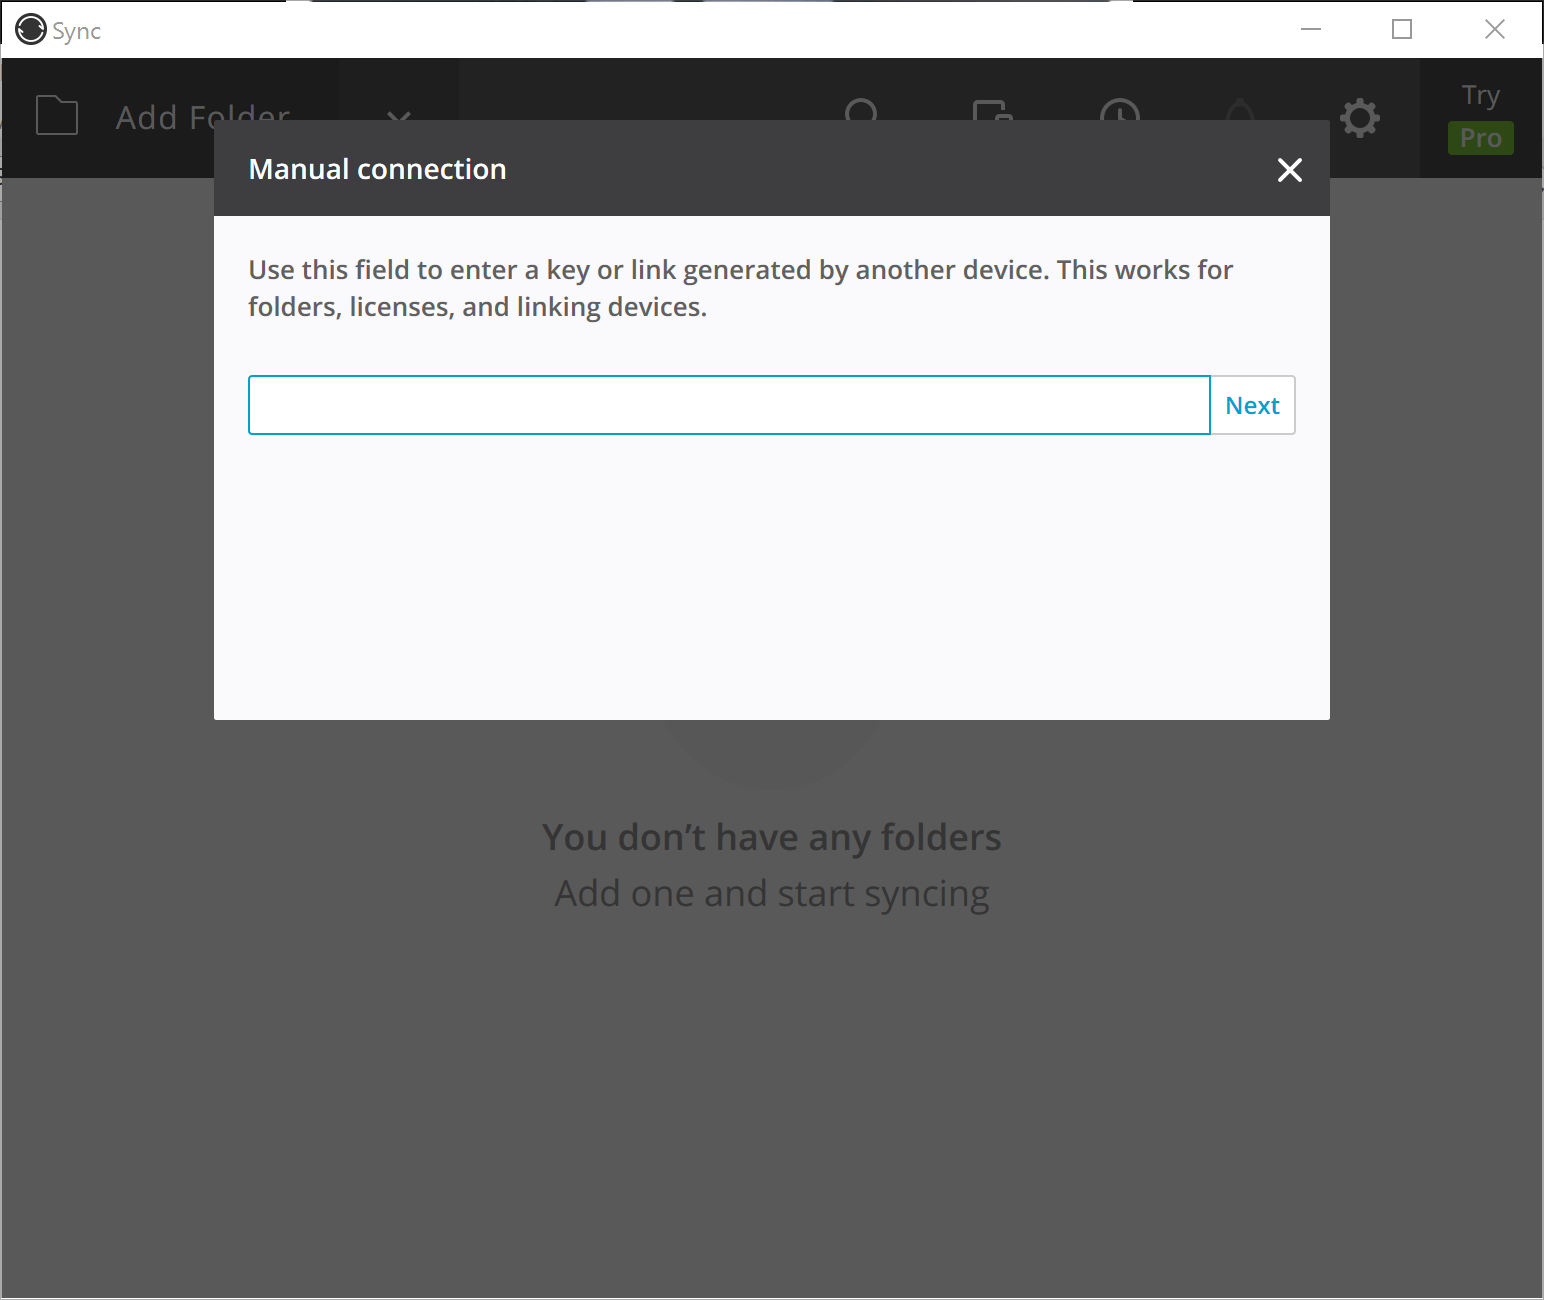
Paste in the text you copied from the dialog on the btsync admin interface, and click “Next”. You’ll get a summary of the folder you are about to connect to, what your rights will be, and you’ll get to choose where those files should be stored on this computer. You’ll also get a reminder that some features, like “Selective Sync” are only available if you upgrade to the Pro version, which is actually pretty cheap.
Click the “Connect” button, and you’re almost there. Back on the browser, you should now see a notice that there is an approval pending.

Click the check mark to approve the connect request, and you’re all set. Files dropped into the folder on either computer will now synchronize to the other.
Wrapping up
As usual, shut down and take a backup of the SD card once you’re happy with the way things are working.
Unlike other “cloud sync” technologies, you own the cloud in this case, and you can do pretty much whatever you want with it. There are no size limits other than your available storage, and you can create as many individual shares as you want. Because of the granular way in which BitTorrent Sync shares your stuff between computers, you can choose to share individual folders with friends and family, and control whether they get full control, or read-only access.
BitTorrent Sync gives you total control of your own private cloud.
Troubleshooting
Files aren’t syncing
If files from one system aren’t showing up on the other, or files only seem to be syncing in one direction, make sure that you’ve shared the right kind of link. Sending a read-only link to your other computer will result in a one-way sync. You may add or edit files on the other computer, but their changes will never make it back to the Pi. When you copy the link, make sure you selected “Read/Write”.
What’s next?
The core functionality of the server is just about done now. In the next post, I’ll show you how to set up an uninterruptible power supply (UPS) using “Network UPS Tools”, or NUT.

another simplified code way to download the program and key by combining commands:
get and save key: wget -O – http://linux-packages.getsync.com/btsync/key.asc | sudo apt-key add –
add to repository: echo “http://linux-packages.getsync.com/btsync/deb btsync non-free” | sudo tee /etc/apt/sources.list.d/btsync.list
For this series, I usually break things up on purpose so that I can explain them individually. Since I hadn’t echoed straight into a file anywhere else, I decided to hand edit the file here for consistency. When I accept things out, I do it the way you suggest though.
I’m getting a warning after running ‘sudo apt-get update’ around the new key. Here is the output:
…
Reading package lists… Done
W: GPG error: http://linux-packages.getsync.com btsync InRelease: The following signatures were invalid: KEYEXPIRED 1482402887 KEYEXPIRED 1482402887 KEYEXPIRED 1482402887
Any thoughts on how to correct this one? Thanks in advance and I also wanted to say this is a great series.
I saw that too on my most recent build. The way I read it, btsync’s signing key has expired. I don’t think there’s anything you can do about it. It will be up to the author of that particular package to update their key. It doesn’t seem to have broken anything, though. I expect it will clear itself up before long since every single debian-based btsync user will be seeing this until it’s fixed.
I actually searched around resilio.com’s forums and found that others had the same issue and their team provided an updated key. Here is the link to the forum:
https://forum.resilio.com/topic/43060-solved-official-resilio-repo-gpg-key-expired/
I ran the suggested update and it seems to have fixed my issue. Here is the update that was posted on the forum:
wget -qO – https://linux-packages.resilio.com/resilio-sync/key.asc | sudo apt-key add –
I am a newby when it comes to linux, so let me know if anything about this looks suspicious. It looks safe to me and wanted to share the fix but please run at your own risk.
It looks like they’ve renamed the key. I imagine the package may change names at some point in the future. They’ve also changed the address to be https instead of http. I’ve updated the instructions accordingly. Thanks for the heads-up. I wasn’t expecting the actual address to change. I figured in a week or so, someone would just drop a new key file in where the old one was, and the problem would go away on its own.
Hi Mel, I must have made a typo when entering the new password… Now localhost keeps asking me to login, but I can’t… What should I do? Thank you!
I’m on my phone, so this link will have to do for now.
http://www.mapledyne.com/ideas/2015/8/4/reset-lost-admin-password-for-raspberry-pi#
Thank you!!
Hi Mel,
Thanks for the interesting and helpful series about setting a raspberry as a home server. It’s been a experience where I learned a lot!
When my server restarts and I want to access the web interface of resilio I receive an error message that the site is not accessible (ERR_CONNECTION_REFUSED). When I restart the service with ‘sudo service btsync restart’ it just works fine.
Any idea how I can get resilio to autostart after a reboot of the raspberry pi?
Somehow I didn’t see this reply show up. Sorry about that. I have also noticed that Resilio sometimes stops working and needs to be restarted. I haven’t noticed it on reboots though. To be honest, I don’t really use Resilio that much though, so I may just be not noticing the problem. I’ll put it on my list of things to check though. I’d start by finding the Resilio logs, and seeing if there’s anything interesting in there. I’m putting this on my list of to-dos.
Hello Mel,
Thank you for such detail instruction with explanation. I got it all working following all the steps including mounting a 2TB HDD for DATA.
Whenever II login from the browser, it tells me that that’s a newer version and ask to upgrade. How do I perform the upgrade. Thanks in advance!
Since Resilio Sync is installed through apt-get, you should be able to update it using apt itself “sudo apt get update” followed by “sudo apt=get upgrade” like anything else. One thing I’ve noticed while working on the Pi is that some software packages phone home to check for updates, and there may in fact BE one, but it hasn’t made its way onto the apt repositories that the Pi uses. Just because there’s a new version out, doesn’t mean it’s pi-ready just yet. I’d start with the apt-get update/upgrade, and if it’s still telling you about it afterwards, then keep checking back. Eventually, the pi apt repositories will catch up, and then you should be all set.
Hi Mel,
Thanks for the quick reply. I did the update&upgrade and that seems to updated it, no more message about newer version.
I also just notice your instruction on Syncthing. Since I have 2 Raspi-3 (from by one get 1 free deal few months ago), I’m thinking setting the other one with Syncthing and see which one I prefer better. My question is can I use the same 2TB Hdd?
I also saw you mentioned both (btsync & syncthing) can be run in the same Raspberry pi.
Thanks.
That’s interesting because I just did the same thing this morning, and it’s still saying there’s an update available. That may be because I haven’t restarted the Pi yet. Anyway, I’m glad that cleared it up for you. Maybe I’ll go reboot the thing now.
Forgot to mention, when I asked use the same 2TB HDD the same time. I meant 2 raspberry pi (1 running btsync and the other running syncthing), both raspberry pi connect to the same USB power hub that the 2TB plugged into.
Thank you!
No, that wouldn’t work. Only one Pi can “have” the drive at a time. You could set up a share on the Pi with the drive, and then connect to it from the other Pi. It’s slower, but once items are synched, you’d probably not notice much of a difference.
Thanks. I’ll try it one at a time. Have a nice day!
Hello Mel,
I’m trying to reinstall Resilo sync after trying syncthing and have lots of error syncing. One think I notice is the command: “sudo nano /etc/apt/sources.list.d/btsync.list” still use btsync.list. Since it’s changed to resilo sync, should I change it to resillo? Thanks in advance!
Unless it’s changed recently, the package is still called btsync. Only the branding had changed last time I looked.
How can I check the package? Thanks.
I was also following https://www.instructables.com/id/Ultimate-Pi-Based-Home-Server/ and was wondering if this syncing is the the same functionality as DRWILSON in the instructable used NO-IP? If its not does your build contain functionality that lets the user access the server from outside the local network?
Pingback: Tech tips for international travel – Travel
Pingback: Tech tips for international travel – Robert Nelson Photography