
Note: This post is part of a series. Each post builds on the previous ones. If you are just trying to add one thing to an existing system that was not built following this series, then I cannot promise that these instructions will work for you, although they probably will. If you’ve started from something other than a non-NOOBS Raspbian image, then you’ll probably need to adjust for that.
Please refer to the series Introduction for a list of all the different posts in the series.
Self-Promotion: I have recorded this series as a screencast for Pluralsight:
(http://www.pluralsight.com/courses/raspberry-pi-home-server)
If you have a Pluralsight subscription, please consider watching it. Reading the instructions is one thing, but watching it done demystifies the whole process.
Thank you!
Update: If you want to know what’s going on under the covers, or want tighter control over your exact configuration, then by all means, read this post in its entirety. I encourage you to do so just to gain an understanding of what’s going on. If, however, you’re just looking for the fastest way to set up a home VPN on a Raspberry Pi, then you should check out PiVPN. It’s basically everything in this article, completely automated. That means that everything you’re about to read can be condensed down to a single command.
curl -L https://install.pivpn.io | bash
After recently having my cable modem upgraded (and finding that it out-performed my own wireless router), I was having some trouble getting my VPN working again. Rather than go through all the steps of my own post, I thought I’d give PiVPN a shot at it. Ten minutes later, most of which was eaten up by generating Diffie-Hellman keys, I had new ovpn files for my various devices, and everything just worked. PiVPN is awesome. It makes me wish there were similar scripts for the other aspects of running a Raspberry Pi Home Server.
Introduction
Now that the whole house is humming along, sharing files, downloading things, and backing everyone up, you might be wondering if there’s anything left that the Raspberry can do for you. The answer is yes. In this article, we’ll set up the Raspberry Pi to act as an OpenVPN server, allowing you to securely access your home network from anywhere. OpenVPN is an open-source, cross-platform, virtual private networking (VPN) application. VPNs let you route internet traffic through a secure, encrypted channel, back to a network that you trust and/or control. You may have used one in order to securely access resources on the network at your office when you’re on the road. Developers sometimes use them to simulate traffic coming into their network from outside for testing. You can add these same abilities to your home network so that you can get to your stuff from work, or a hotel, or anywhere else with internet access. Running your own VPN means that no matter where you get an internet connection from, you are effectively “at home”. You don’t need to worry about fellow patrons at the coffee shop listening in on your network traffic because the traffic between you and your VPN is highly encrypted.
Acknowledgements
Once again, I didn’t invent this stuff. Most of the information about how to set up OpenVPN comes from a whitepaper by Eric Jodoin of the SANS institute. That whitepaper was later paraphrased and simplified in a pair of posts by Lauren Orsini. Both are excellent reading, and go into far more depth about how all this stuff works than I plan to. I’m just putting it into the same format as the other posts in the series, and organizing them in a logical progression, building on top of the previous posts in this series.
Prerequisites
In order to connect to your home network’s VPN when you are away from home, you are going to need either a static IP address, or a dynamic IP resolution service like www.no-ip.org. My home router updates no-ip automatically, so I have not set up a program on the Raspberry Pi to do this. Other tutorials exist out there to handle this part.
Internet security
Warning: The explanation that follows is super-non-technical™, and probably wildly inaccurate in many important ways. I am not a security or cryptography expert, but this is, in layman’s terms, how internet security works. When you visit your bank’s website, and something in your address bar turns green, or grows a little lock, it means that someone at the bank went to some authority that we’ve all agreed to trust, and got a certificate that says “Yup these guys are the bank alright”, and installed it on the web server you’re talking to. As long as you trust the people that made the certificate to only give it to the company that paid for it, and as long as you trust the bank to only install the certificate on their own servers, then you have a way to prove that the server you’re talking to belongs to the company you think it does, or at least a company that the authority vouched for.
Although I’m sure you trust your own word that the Raspberry Pi Home Server that you’ve been building is your own, your other computers are still going to want proof that the thing on the other side of the internet is, in fact, your server, and not someone else pretending to be your server. That’s kind of the whole point of this exercise, after all. Since you trust yourself, you can act as your own “certificate authority” and make your own certificates. You then install your homemade certificates on both the server and the client machines, and they can use that certificate to encrypt traffic back and forth between them.
Install OpenVPN
First things first, you’ll need to install the OpenVPN software onto the Raspberry Pi. You’ll also need the OpenSSL and EasyRSA packages in order to secure your connection later on. Installing them is as simple as…
sudo apt-get install openvpn openssl easy-rsa
That’s the easy part. Now comes the configuration. The EasyRSA installer has created some sample configuration files for us, and they’ll form the skeleton of the real configuration. Copy the entire directory of sample configuration files like this:
sudo cp -r /usr/share/easy-rsa /etc/openvpn/easy-rsa
Open the “vars” file for editing.
sudo nano /etc/openvpn/easy-rsa/vars
Find the “export EASY_RSA” entry, set it as follows:
export EASY_RSA="/etc/openvpn/easy-rsa"
A little further down, you’ll see a line that begins with “export KEY_SIZE”. In current installations, this should already be set to 2048, so you shouldn’t need to change it. Previous installations used 1024 bit keys, but the current recommendataions are to use 2048 for increased security.
Move to the bottom of the file, and change the defaults that are defined there to match your location and network. This will save you some time later on when you are asked to provide this information again for each user you set up. Mine looks like this:
export KEY_COUNTRY="US"
export KEY_PROVINCE="OH"
export KEY_CITY="Columbus"
export KEY_ORG="Home"
export KEY_EMAIL="melgrubb@…"
export KEY_OU="RPHS"
KEY_NAME affects the name of the resulting key file, but is otherwise arbitrary. The organization unit (OU) setting is not important for a small home network, so I’ve just gone ahead and used the server name.
export KEY_NAME="RPHS"
You can leave the other settings at their defaults. Close Nano, saving the file (ctrl-x, y, enter)
Become a certificate authority
In order to create certificates, you’ll need… wait for it… a certificate. In this case, it’s a “root certificate”. This is the kind of thing that one of the trusted authorities out on the web would have. The “easy-rsa” package you installed earlier can generate such a certificate for you. Run the following commands to set up a key server. Notice that the “sudo su” command is being used here. You’re going to stay in “god mode” for pretty much the remainder of this post.
sudo su
cd /etc/openvpn/easy-rsa
source ./vars
./clean-all
./build-ca
This last command will prompt you for a lot of values, fortunately, you set up reasonable default values above, so you can just hit enter to accept them. When prompted for “Common Name”, I’ve used the server’s name again (RPHS). When you create certificates for other computers or users, you’ll want to use their names here.

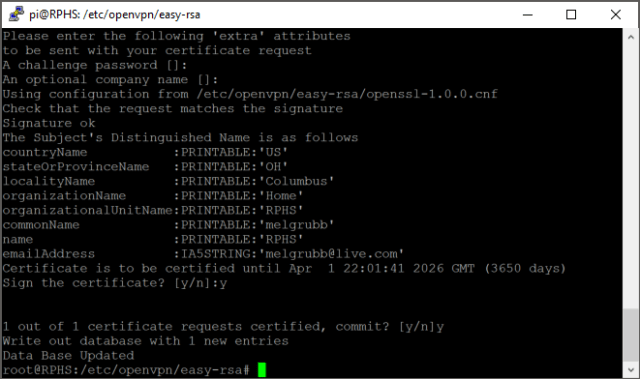
When that finished, enter the following command, substituting the name of your server, and accepting the defaults again. You’ll get a couple extra questions this time. Make sure the challenge password and company name are left blank, and accept any other defaults.
./build-key-server RPHS
Answer yes to the “Sign the certificate?” and “commit?” prompts.

Next, we’ll build the Diffie-Hellman parameters file.
./build-dh
Go get some coffee or something, this step is likely to take a very long time. Sometimes it does, sometimes it doesn’t. It’s pretty random what kind of wait you’ll have, but since the change from 1024 bit keys to 2048 bit keys, the likelihood of this taking a long time has definitely increased.
The screen will fill up with a lot of dots and plus signs while it works to let you know that it hasn’t gone to sleep or locked up. As long as the symbols keep coming, let it keep doing its thing.

When it’s done, generate a hash-based message authentication code (HMAC). This is yet another layer of protection, and helps to prevent denial of service (DOS) attacks without taxing the Pi’s processor too much with decryption of bogus data.
openvpn --genkey --secret keys/ta.key
Configure the OpenVPN Server
Now it’s finally time to edit the OpenVPN configuration and tie up the loose ends.
nano /etc/openvpn/server.conf
You’ll notice that the editor is totally blank. That’s because this file doesn’t exist yet. Paste in the following text, substituting your own values for the highlighted values. You’ll need your Raspberry Pi’s IP address, the IP address of your router, and the name you used above when calling build-key-server.
Note: I’ve also highlighted the protocol (udp) and port (1194). You can change these to something else if needed. I’ll talk about this more in the troubleshooting section at the end.
local 192.168.1.XXX # YOUR PI'S IP ADDRESS
dev tun
proto udp
port 1194
ca /etc/openvpn/easy-rsa/keys/ca.crt
cert /etc/openvpn/easy-rsa/keys/RPHS.crt
key /etc/openvpn/easy-rsa/keys/RPHS.key
dh /etc/openvpn/easy-rsa/keys/dh2048.pem
server 10.8.0.0 255.255.255.0
# server and remote endpoints
ifconfig 10.8.0.1 10.8.0.2
# Add route to Client routing table for the OpenVPN Server
push "route 10.8.0.1 255.255.255.255"
# Add route to Client routing table for the OpenVPN Subnet
push "route 10.8.0.0 255.255.255.0"
# your local subnet
push "route 192.168.1.0 255.255.255.0" # YOUR PI'S IP SUBNET
# Set primary domain name server address to the SOHO Router
# If your router does not do DNS, you can use Google DNS 8.8.8.8
push "dhcp-option DNS 192.168.1.1" # YOUR ROUTER'S IP ADDRESS
# Override the Client default gateway by using 0.0.0.0/1 and
# 128.0.0.0/1 rather than 0.0.0.0/0. This has the benefit of
# overriding but not wiping out the original default gateway.
push "redirect-gateway def1"
client-to-client
duplicate-cn
keepalive 10 120
tls-auth /etc/openvpn/easy-rsa/keys/ta.key 0
cipher AES-128-CBC
comp-lzo
user nobody
group nogroup
persist-key
persist-tun
status /var/log/openvpn-status.log 20
log /var/log/openvpn.log
verb 1
Exit nano, saving your changes (ctrl-x, y, enter) Next, you need to allow the Raspberry Pi to forward IP traffic, which it does not do by default.
nano /etc/sysctl.conf
Find the line that says “Uncomment the next line to enable packet forwarding for IPv4”, and uncomment the line immediately after it.
# Uncomment the next line to enable packet forwarding for IPv4
net.ipv4.ip_forward=1
Exit Nano, saving your changes (ctrl-x,y,enter), and force a reload of the settings.
sysctl -p
Configure Firewall
The Raspberry Pi has its own firewall, which must be configured to allow the VPN traffic through. Create a script file to automate the opening of the appropriate ports.
nano /etc/firewall-openvpn-rules.sh
Copy in the following text, substituting your own Raspberry PI’s IP address where highlighted.
#!/bin/sh

iptables -t nat -A POSTROUTING -s 10.8.0.0/24 -o eth0 -j SNAT --to-source 192.168.1.XXX
Change the permissions on the file you just created so that it can be executed, and assign ownership to the root user.
chmod 700 /etc/firewall-openvpn-rules.sh
chown root /etc/firewall-openvpn-rules.sh
This script file needs to run every time the Raspberry Pi boots up in order to do us any good. Edit the /etc/network/interfaces file.
nano /etc/network/interfaces
Find the line that configures the wired ethernet port. If you are running your server wirelessly, then you’ll need to adjust accordingly. Insert a new line, indented underneath so that the result looks like this:
...
iface eth0 inet dhcp
    pre-up /etc/firewall-openvpn-rules.sh
...
This will ensure that the firewall rules are applied to that network interface even before it has started up.
One last thing, and this is new with the Jessie release. As commenter Craig pointed out in the previous version of this post, we need to stop OpenVPN from starting TOO soon. Edit the OpenVPN service file.
sudo nano /lib/systemd/system/openvpn@.service
Add the followling line at the end of the first section (Unit).
After=multi-user.target
Finally, reboot in order to apply the changes, and everything should be up and running.
sudo reboot
Generate keys
You may be able to just take your bank’s word for it that they are who they say they are, but VPN servers like the one we’re building want proof of the client’s identity as well. They won’t let just anyone in. You need to give a key to each device or user you want to allow to connect to the VPN server. You have a decision to make at this point. You could generate a unique key for each individual device that you want to connect via VPN, or you could take a shortcut and generate a key for each user. The difference is whether you expect to need to connect more than one device at the same time. If you don’t need to connect more than one device per user at the same time, generate a key named for the user. If you think users will need more than one device connected at the same time, I’d suggest naming the key after the device. Whichever you decide, generate a key like this, substituting the name of the user or computer that will use this key to connect:
sudo su
cd /etc/openvpn/easy-rsa
source ./vars
./build-key-pass NAME
The PEM password is a password you’ll need in order to use the resulting key file. Pick something nice and strong, but also something you won’t forget. If you want to be really paranoid, you could randomly generate one and keep it in a password safe. The choice is yours.
Accept the remaining defaults again, again leaving the challenge password and company name blank. Sign and commit the certificate when prompted.
Almost done. Next we need to convert the user/computer’s key into a format usable by OpenVPN.
cd keys
openssl rsa -in NAME.key -des3 -out NAME.3des.key
Use the same password as you did before. You’ll have to enter it three times. Technically, the first time is a different password, but how are you supposed to keep them straight?
Generating client keys
Connecting a VPN client to a remote server takes a bit of configuration, too. The OpenVPN client has to know where the server is, and it has to have a copy of the keys we generated earlier. All of this configuration gets wrapped up into a file with a .ovpn extension. You can create these by hand if you like, but Eric Jodoin, the author of the original SANS.org article was kind enough to write a script to do it for us. Create the script file.
nano /etc/openvpn/easy-rsa/keys/MakeOVPN.sh
This is a new file, so it will be totally blank. Paste in the following:
#!/bin/bash

# Default Variable Declarations
DEFAULT="Default.txt"
FILEEXT=".ovpn"
CRT=".crt"
KEY=".3des.key"
CA="ca.crt"
TA="ta.key"

#Ask for a Client name
echo "Please enter an existing Client Name:"
read NAME

#1st Verify that client's Public Key Exists
if [ ! -f $NAME$CRT ]; then
echo "[ERROR]: Client Public Key Certificate not found: $NAME$CRT"
exit
fi
echo "Client's cert found: $NAME$CR"

#Then, verify that there is a private key for that client
if [ ! -f $NAME$KEY ]; then
echo "[ERROR]: Client 3des Private Key not found: $NAME$KEY"
exit
fi
echo "Client's Private Key found: $NAME$KEY"

#Confirm the CA public key exists
if [ ! -f $CA ]; then
echo "[ERROR]: CA Public Key not found: $CA"
exit
fi
echo "CA public Key found: $CA"

#Confirm the tls-auth ta key file exists
if [ ! -f $TA ]; then
echo "[ERROR]: tls-auth Key not found: $TA"
exit
fi
echo "tls-auth Private Key found: $TA"

#Ready to make a new .opvn file - Start by populating with the default file
cat $DEFAULT > $NAME$FILEEXT

#Now, append the CA Public Cert
echo "<ca>" >> $NAME$FILEEXT
cat $CA >> $NAME$FILEEXT
echo "</ca>" >> $NAME$FILEEXT

#Next append the client Public Cert
echo "<cert>" >> $NAME$FILEEXT
cat $NAME$CRT | sed -ne '/-BEGIN CERTIFICATE-/,/-END CERTIFICATE-/p' >> $NAME$FILEEXT
echo "</cert>" >> $NAME$FILEEXT

#Then, append the client Private Key
echo "<key>" >> $NAME$FILEEXT
cat $NAME$KEY >> $NAME$FILEEXT
echo "</key>" >> $NAME$FILEEXT

#Finally, append the TA Private Key
echo "<tls-auth>" >> $NAME$FILEEXT
cat $TA >> $NAME$FILEEXT
echo "</tls-auth>" >> $NAME$FILEEXT

echo "Done! $NAME$FILEEXT Successfully Created."
Exit Nano, saving your changes (ctrl-x,y,enter) Once again, because this is a script, permissions will have to be altered to allow it to run. Make sure you match the casing of the script name here.
chmod 700 /etc/openvpn/easy-rsa/keys/MakeOVPN.sh
Create the Default.txt file to hold the default values the script will use. The casing isn’t important, but it must match what was specified at the top of the script file. I’m keeping the capitalized “D” just to keep it the same as anyone else who followed Eric’s instructions.
nano /etc/openvpn/easy-rsa/keys/Default.txt
Paste in the following, substituting your public IP address for the highlighted text. If you don’t have a static public IP address, you can use a dynamic name from a service like DynDNS or no-ip here as well. The “1194” is the standard port number OpenVPN uses, adjust as needed to match your network configuration.
Note: Once again, I’ve highlighted the protocol (udp) and port (1194), which you can change if needed. See the troubleshooting section at the end for more information.
client
dev tun
proto udp
remote YOUR_PUBLIC_IP_ADDRESS 1194
resolv-retry infinite
nobind
persist-key
persist-tun
mute-replay-warnings
ns-cert-type server
key-direction 1
cipher AES-128-CBC
comp-lzo
verb 1
mute 20
Exit Nano, saving your changes (ctrl-x,y,enter) Execute the script to create a .ovpn file. Remember to use the user or device name you chose earlier when creating the client key.
cd /etc/openvpn/easy-rsa/keys
./MakeOVPN.sh
The result is a NAME.ovpn file in the /etc/openvpn/easy-rsa/keys folder on the Raspberry Pi. That’s great, but we need the key on the client machine. You can copy the file using a secure copy program like WinSCP, copy it to a flash drive and move it by hand, or any other number of ways to move a file around. Since this is my own private home server, I’m going to put the file on the data share, at least temporarily. Once the key is installed and working on the client, I’ll delete it from the server.
cp /etc/openvpn/easy-rsa/keys/NAME.ovpn /mnt/data/
Keys like this aren’t something you should leave lying around. On the other hand, you should probably have a backup of them somewhere. If you put them on a flash drive, go put it in a safe or something. Don’t let anyone get a hold of your keys, or they have a free pass into your home network, and you may not even notice it. You can always go back and generate new keys, delete the compromised ones, and continue on, of course.
Port forwarding
Before you’ll be able to connect to your home network from outside, you’ll need to set up your router to forward all traffic on port 1194 to the Raspberry Pi. I can’t tell you how to configure the firewall on your router at home because I don’t know what kind of router you have. An excellent resource that may have information specifically for your router is http://portforward.com/.
Client configuration
I’m using the OpenVPN client for Windows, but the instructions should be similar for other platforms. You can download open-source clients for Windows, and source tarballs for other systems from here.
Note: Don’t try to download client software from the links on the front page of the OpenVPN site or you’ll just end up with “SecureTunnel”, a paid-subscription-based system that lets you do exactly what you’re already set up to do on your own. Get the .ovpn file that you generated on the Raspberry Pi over to the computer you’re going to connect from, and put it in the OpenVPN config folder. For Windows users, this should be C:\Program Files\OpenVPN\config.
Connecting the client
You’ll need to be somewhere other than on your own network for this next part. Otherwise you’re seriously crossing the streams, shutting down the containment grid, etc. Disconnect from your home network and tether yourself to a phone or something before continuing. Run the OpenVPN GUI application. It should have created a shortcut in your start menu for Windows 7 users, or on your app list for Windows 8 users. Run it, and it should pick up on the .ovpn file and open a connection. Right-click on the notification area icon (for Windows users), and select “Connect”.
You’ll be prompted for the password you created earlier, and if everything is configured correctly, the OpenVPN icon should turn green, and you’ll be effectively connecting to the outside world as part of your home network. There are, of course, many issues you could run into when using a VPN. Most of them are explained pretty well on the HowTo page of the OpenVPN site. One of the more vexing problems is that of disambiguating IP addresses between your home network, and the network you are connected to. See “Numbering Private Subnets” for more information.
Troubleshooting
“I can’t connect from work”
This one got me, too. If you’ve tested your VPN, and you know it works, but it doesn’t work from a specific network, then port 1194 might be blocked on that network. I couldn’t connect from work when I was using udp port 1194, although it would work find when I tethered my computer to my phone. If that’s the case, then you can change the server.conf and .ovpn files to use a different protocol and port. Changing “udp” to “tcp” and “1194” to “443” will usually work from anywhere, as long as you’re not using that port for something else already. TCP port 443 is what https traffic uses, so the odds of it being blocked are pretty slim. Remember to update your router’s port-forwarding rules, update BOTH files, and restart the OpenVPN server (sudo service openvpn restart) as well as your OpenVPN client, and it should connect just fine.
What’s next
In the next post, we’ll add Resilio Sync, allowing you to build your own private synchronization “cloud”.

If you make your ip address manual (not like yours here: iface eth0 inet dhcp, instead iface eth0 inet manual), the pre-up script won’t work. You need to add just before “auto eth0”
https://www.raspberrypi.org/forums/viewtopic.php?f=28&t=129737
I’ll try it out that way and clarify, thanks. I always handle my IP assignments from the router through leases, so I didn’t run it this way.
Great series of articles 🙂
From above:
nano /etc/openvpn/easy-rsa/keys/MakeOVPN.sh
and
chmod 700 /etc/openvpn/easy-rsa/keys/makeovpn.sh
caught me for a while on the use of CAPITALS !!!
Regards
I’ll update them to match now. I guess I’ll keep the capitals, since that’s what the original Eric Jodoin script uses.
In the “Configure Firewall” section, the interfaces pre-up directive did not work for me. Not sure why, probably because I rely on my router dhcp server for ip address assignment. Executing the same script manually did the trick tho.
I ended up installing the iptables-persistent package instead. At install, it persists the already configured ipv4 and ipv6 rules. May be a good idea to add that as an alternative. Cheers!
It could be a copy paste thing. I’ve had issues with WordPress trying to “fix” my posts. This usually means that hyphens get turned into em-dashes, which looks fine on-screen, but doesn’t work at the command line. If you copied and pasted the command into the script, but hand typed them at the command line, I’ll bet that was it. I’ll re check the text on that one.
I like the way you’ve got a one stop guide to setting up all the tools to turn a RPI into a very useful server….Thanks.
On following the instructions near the end of setting up openVPN I don’t have the file
/lib/systemd/system/openvpn@.service
To stop OpenVPN from starting TOO soon.
Also, at the start there is no package easy-rsa, I just installed openvpn and copied the easy-rsa files using:
sudo cp -r /usr/share/doc/openvpn/examples/easy-rsa/2.0/ /etc/openvpn/easy-rsa/
I hope this is not why I don;t have the service file!
Thanks.
Thank you for pulling this all together.
However, I can not get it to work…
Couple questions: if I am using wireless then I should change eth0 to wlan0 here?
iptables -t nat -A POSTROUTING -s 10.8.0.0/24 -o wlan0 -j SNAT –to-source 192.168.1.XXX
And here?
iface wlan0 inet manual
wpa-conf /etc/wpa_supplicant/wpa_supplicant.conf
pre-up /etc/firewall-openvpn-rules.sh
Can you recommend a simple test to see if the port is open on the rPi?
For the VPN settings, that looks right to me, although I’m at work and can’t verify that at the moment. For the WLAN settings themselves, I’d have to try that myself to be sure. I’ve not tried it wirelessly, so it could read a little differently. You might try looking through the comments on the previous version of the article too. I seem to remember the subject coming up there in the past. I’ll add this to the list of revisions, and try it out the next chance I get. It’s too bad this is a Monday. I should have a chance this week though.
Thanks for the response. No need to do anything further as I got working as stated. After I found the openVPN log on the server it indicated I had a error in my verb statement; checking it I had missed the 1. All is good – thanks again for the write up.
how do you add more than one user and network range for multiple similtanous clients
I can’t honestly say I’ve done this on the Pi since I’m the only user of mine, but all that should be required is to create multiple keys, one for each user or device that’s going to connect. You can’t use the same key more than once simultaneously, but if you generate the keys per-device rather than per-user, you’re supposed to be able to connect more than one device at a time. I’ll have to give it a shot and see what happens myself.
thanks for the reply
I’ve followed these instructions several times but never managed to get everything working. Today have decided to ask for help!
Assume all configs are as per your instruction but with the following changes:
My home LAN: 10.10.10.x (home router IP 10.10.10.1)
The RPHS server 10.10.10.107
My router does not offer DNS so I’m pushing 8.8.8.8 (Google) as per the comment in the server.conf
External (client) LAN (192.168.43.x).
I’ve put the .ovpn on the client laptop and am using an EE Mobile connection so I can be “off-LAN” but still physically have all the computers in one place to do the testing. I’m running openvpn client v2.4.2 (latest at May 2017).
From the client:
Connection is successful, I get awarded IP: 10.8.0.6.
PING 10.8.0.1 (vpn gateway?) – SUCCESSFUL
PING 10.10.10.107 (the PI) – SUCCESSFUL
PING 10.10.10. – FAIL – Request Timed Out
PING google.com – resolves IP (216.58.208.174) but pings fail – Request Timed Out
browsing – chrome – ALL sites “can’t be reached”
So – it looks like I get connectivity, but no routing and no access to resources on the LAN.
I confess I don’t know how to read / interpret a ROUTE PRINT output, but having the ability to ping both the oVPN gw at 10.8.0.1 and the RPHS by it’s internal LAN IP 10.10.10.107 must mean I’m most of the way there – is this issue therefore on my LAN or my RPHS setup (routing / forwarding?)
Many thanks!
Well, it’s a little hard to guess without actually being there, but have you made sure you can ping those machines by those addresses when you’re on the LAN? I’m just starting with the most basic things here, but if those machines don’t respond to pings due to firewall issues or something, that would explain it. For your second example, are you pinging the Pi that OVPN is actually running on, or a different Pi somewhere else on the network. If not for the first Ping being successful, I’d almost suspect that it’s not really bridging the two networks like it should. I’m far from an Open VPN expert, but since the problem is not Pi-specific, and might affect regular desktop users as well, it may have come up on the OpenVPN forums (https://forums.openvpn.net/). I have recently had to rebuild my network at home, so I’m still trying to get this all set up again as well. I have moved to a 10.x.x.x address as well since 192.168.x.x seems to have conflicts wherever I go (work, public networks, etc.) I may get to that this week, and I’ll see what comes up.
Thanks Mel,
There is only the one linux device on my network at this time, the RPI v3, so it is both the VPN gw 10.8.0.1 and the internal LAN IP 10.10.10.107.
All the windows machines on the LAN are ping-able from within the LAN.
Thanks for the referral to openVPN forums – I will ask there but unfortunately the conversation gets above my head very quickly, in particular on the linux side. I wanted to use openVPN rather than Windows Server’s built-in VPN as the windows offering is just username+password secured whilst openVPN uses certificates (which I wanted) but I’m no linux expert so had hoped that following instruction would be enough alone to get me there….
Good luck with your own migration onto 10.x.x.x I hope you either succeed – or if you hit this same issue then you resolve it and can help me further!
Thanks!
I’m having trouble getting to this, but I might have a shortcut for you. Take a look at http://www.pivpn.io/
Basically, it’s an automated install of the whole thing. If there’s a setting that simply got “wrong” somewhere along the line, then maybe an automated setup will fix things. It’s open source on GitHub, so with any luck it’ll stay up to date and know how to deal with any hiccups that come along. It kind of obviates the need for my entire article, but the posts are still useful for understanding exactly what’s really going on.
I checked out PiVPN, and I can honestly say it totally automates almost the entire process covered here in my blog post. About the only thing it didn’t get quite right was letting me fill in my no-ip address, but you can just edit the resulting .ovpn file with any text editor and fix that. This thing seriously took care of every single step. I’m going to need to update this post soon and say “read through all of this if you want to know what’s going on, but seriously… just run PiVPN”. It’s that good. I wish there were scripts like this for all of the steps of setting up a server. I mean, I wouldn’t have the blog entries then, but I can always find something else to write about.
Thanks for the info about PiVPN – it’s next on my list to try. Fingers crossed for success – I’ll contribute any new experience gained here once I’ve gone through the process 🙂
edit: my third PING is supposed to read that I’m PINGing other IPs I know to be on my LAN e.g. 10.10.10.x where “x” is a range of machines I know are up and running. Some serving web sites (IIS), some SMB/windows network shares etc.
Mel and Glen, A little feedback on PiVPN – After reading about it here I gave it a try and it simply resolved all of the issues I’ve had over some time with OpenVPN. I’m able to connect remotely from my other devices and travel router. Great information on a great script. Thanks!
If I install and configure openvpn according to your tutorial on CentOS 7, will it work? And do I have to create the file “/etc/firewall-openvpn-rules.sh” as iptables is replaced with firewalld(firewall-cmd) on CentOS 7? Or is there a way to configure that ‘NAT’ rule through firewalld? If It is possible to populate that ‘NAT’ rule through firewalld(firewall-cmd) would you be kind enough to show us how to do it?
In general, yes it should work, but as you mentioned already, things are going to be very different. You’ll use Yum instead of apt-get, and your system does not use iptables. There’s no reason why it shouldn’t work, but I’ve never done it, so I can’t tell you exactly what the steps are going to be. Surely someone out there has written something on this topic. It looks like there’s some interest in teaching the PiVPN script to work on CentOS as well (https://github.com/pivpn/pivpn/issues/205), although it’s not finished yet.
I recently set up a openvpn server on CentOS 7.3 on my VMware Workstation and tested the server
from a Windows 8.1 client. And I was successful. Would you test the configuration and make a script out of it just like you did with pivpn for debian based systems. If you are interested, tell me how can I send the documentation I made from my tests.
I did not write pivpn. It automates the same process I documented on my blog, and more, but I didn’t write it.
I’m sorry for wrongly assuming that you did create pivpn. I’m sorry to bother you.
No bother at all.
Pingback: External SSH access on the Raspberry Pi | MelGrubb.ToBlog()
Mel, Great information, I originally started setting up the RPHS after watching your video on pluralsight. I then discovered that you had a version 2 of the setup. Do you have any instructions for Stretch? The directory structure is different in Stretch than it is in Jessie. It uses dhcpcd.conf vice interfaces. There is no openssl.cnf file, so you have to link ” ln -s openssl-1.0.0.cnf openssl.cnf” file etc. When I try to run pivpn, I get a report that everything works correctly. I reboot, pivpn -a, create clients, it reports that it was successful but there is no ovpn subdirectory created, and no .ovpn files stored on the pi. I am definitely a NOOB when it comes to Linux / debian / Raspbian. I have been able to setup everything to this point, putty, VNC, webmin, samba, hdd with shares, minidlna. My home network has MS Essentials Server 2016 that provides dhcp, I’ve googled and failed to find anything that actually explains OpenVPN on Raspbian Stretch.
Hmm. I’ve been letting pivpn take care of that part for me and haven’t had any problems. I haven’t built a stretch instance from scratch yet though. Mine was upgraded in place. I’m hoping to get to that soon though. If check the pivpn pages or forums. Surely they must be aware of any problems by now.
I set this up successfully using pivpn when rebuilding my RPHS after an SD card crash.
In the last couple of weeks I found that I was no longer able to connect to the VPN. Nothing in the client I was using (OpenVPN on Android) made it obvious where the failure was occurring. After some time with logs and web searches I tracked it down to a stricter enforcement of the CRL which is generated as part of the set up process. Since it was not obvious I thought others may find the information useful:
# change to the easy-rsa directory.
cd /etc/openvpn/easy-rsa
# generate a new certificate, this will report where it is placed
sudo ./easyrsa gen-crl
# move up to openvpn folder
cd ..
# rename the old certificate for reference.
sudo mv crl.pem crl.pem.
# copy the new certificate so it can be found by openvpn
sudo cp easy-rsa/pki/crl.pem crl.pem
# restart openvpn
sudo systemctl restart openvpn
# rejoice in fixed vpn capability.
It should be possible to extend the lifetime of the generated certificate, but I figured that would just make it less likely I would remember this information when it happened again, so I just set a reminder in advance of the next timeout, the default seems to be 180 days.
Hi Mel,
I’ve been using a Pi server for a long time (thanks to you, so thank you!), and did not update for a long time. Every thing was working perfectly, until I recently updated it.
Now the OpenVPN doesn’t work without the “After=multi-user.target” on the service file. The problem is when I add it, ssh stop working and I always get the message “System is booting up. See pam_nologin(8)”.
Any suggestion to solve it?
Well, I can’t say I’ve seen that exact behavior. Interestingly, I just updated all of my servers yesterday, and my openvpn seems to be working. One thing to try is completely reinstalling the affected components. I’ve done that a few times to fix broken bits. About once a year, I completely rebuild the whole thing, usually when they’ve made a major change to Raspbian.
Ok, thanks. I was avoiding that, but will stop with this laziness and do this. And maybe its time to move from my raspberry 1 after all… LOL.
Hey Mel,
I have been reading and following your blog and implementing your directions, so when I restart my pi after going into the openvpn service and add “After=multi-user.target”, it decides that it can’t authenticate my normal user. Can you give me any pointers on this issue? I downloaded the openvpn program for my pi within the last year.
Thank you.
It sounds like I may have to revisit this article when I have time. Something has changed. I’d try the openvpn site, wiki, forums, etc first. Surely it’s come up. I’ll also be checking the raspberry pi forums to see if there are other reports of this behavior.
Thank you for the reply! I will definitely do that and if I find anything I will let you know!