
Note: This post is part of a series. Each post builds on the previous ones. If you are just trying to add one thing to an existing system that was not built following this series, then I cannot promise that these instructions will work for you, although they probably will. If you’ve started from something other than a non-NOOBS Raspbian image, then you’ll probably need to adjust for that.
Please refer to the series Introduction for a list of all the different posts in the series.
Self-Promotion: I have recorded this series as a screencast for Pluralsight:
(http://www.pluralsight.com/courses/raspberry-pi-home-server)
If you have a Pluralsight subscription, please consider watching it. Reading the instructions is one thing, but watching it done demystifies the whole process.
Thank you!
Important notes:
Of all the parts of this series, this is the one that seems to have the most frequent breaking changes. Every time I turn my back, CrashPlan updates itself and throws out all of the patching and tweaking that made it work on the Pi in the first place, and the most recent breaking changes are pretty terminal.
At the current time, there is no simple way to get things working properly on the Pi. There are some hacks to install an old version and prevent it from updating itself, but they have problems of their own. For instance, you’ll keep getting emails from Code42 insisting that nothing has been backed up in weeks or months, even though CrashPlan itself reports that things are going just fine.
There’s also the issue of version compatibility. The CrashPlan instance running on your desktop will keep on updating itself, and eventually the difference between the version on the Pi and the version on your desktop will be so far out of sync that they will probably refuse to talk to each other, so in this version of the server, I’m going to go with a workaround that should be more permanent, but has significant drawbacks over a full installation. At the very least, this will get you a working backup for safety while I continue to research a way to get the full system running again.
You can refer to the original CrashPlan article, and the enormous tail of comments it has grown if you want to try to install CrashPlan directly on the Pi. I’m going to sidestep that and not install anything on the Pi at all.
CrashPlan-less CrashPlan
The secret is that since v4.3, CrashPlan has grown the ability to be installed on a per-user basis. This will allow CrashPlan to back up to a network location, which it can’t do otherwise. There are good reasons for this, but we don’t need to go into them here.
This ability comes with a cost, though. Since CrashPlan won’t be running as a service in the background when no-one is logged in anymore, the computer won’t get backed up until you log back in. If you’re the only user of a particular computer, then this won’t really matter. Instead of logging out at the end of the day, just lock the computer, and everything should still work just fine.
Create the backup share
Create an entirely new share as described in the Samba post, or a “backups” folder inside your existing public share. I’m creating a new share for organizational purposes. Linux or Mac OS user will need to create a symbolic link to the share somewhere in their filesystem. Windows users will “Map” the share as a drive letter or location within NTFS.
Navigate to the backup share or folder in Windows Explorer (e.g. \\rphs\backups). Right-click the backup share you created above and then “Map Network Drive”. Choose an unused drive letter, and leave “Reconnect at sign-in” selected.
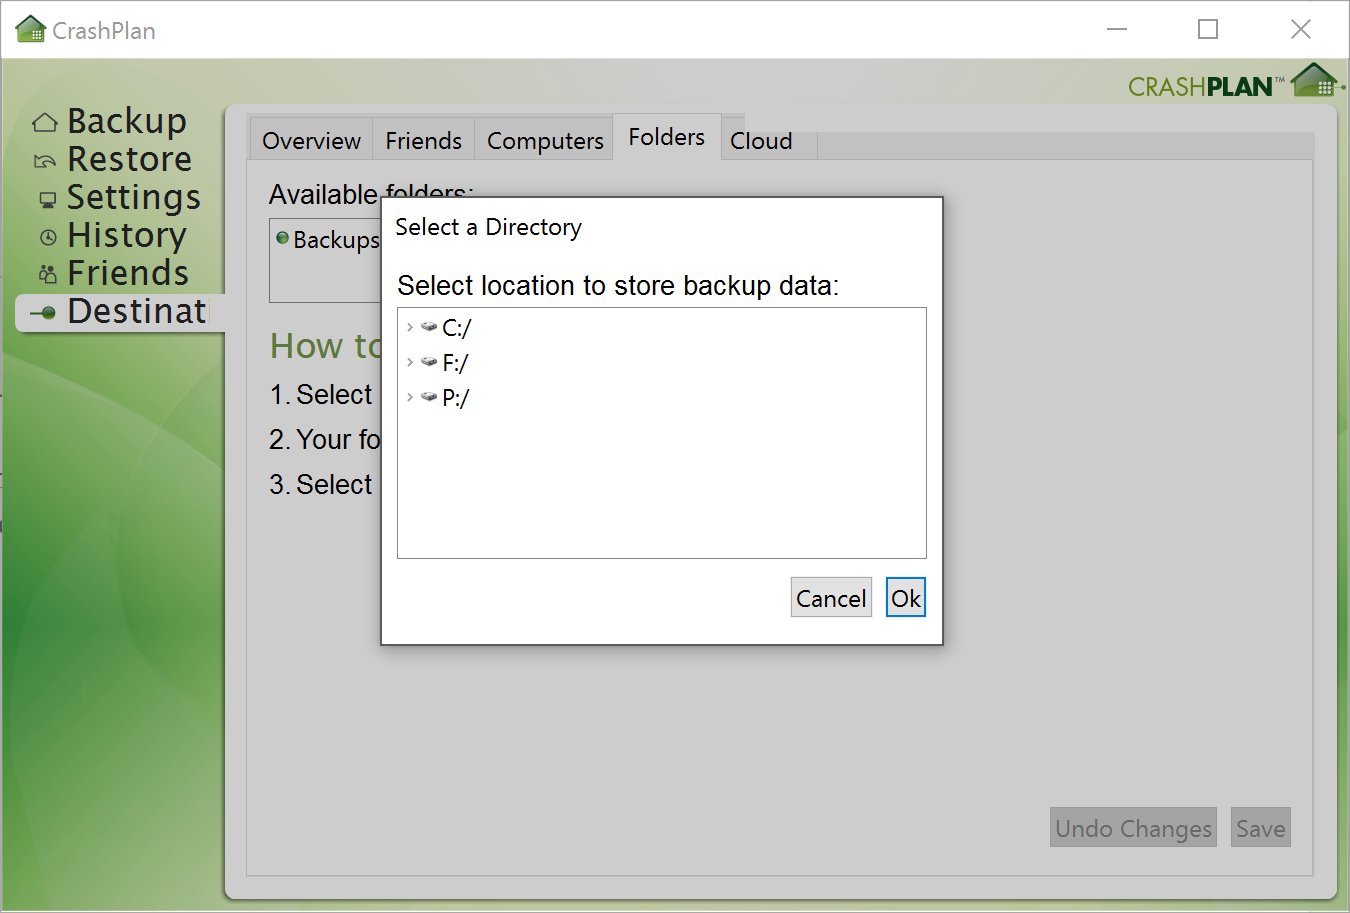
Note: This screenshot is from me setting up my CrashPi as a destination.

Per-user CrashPlan
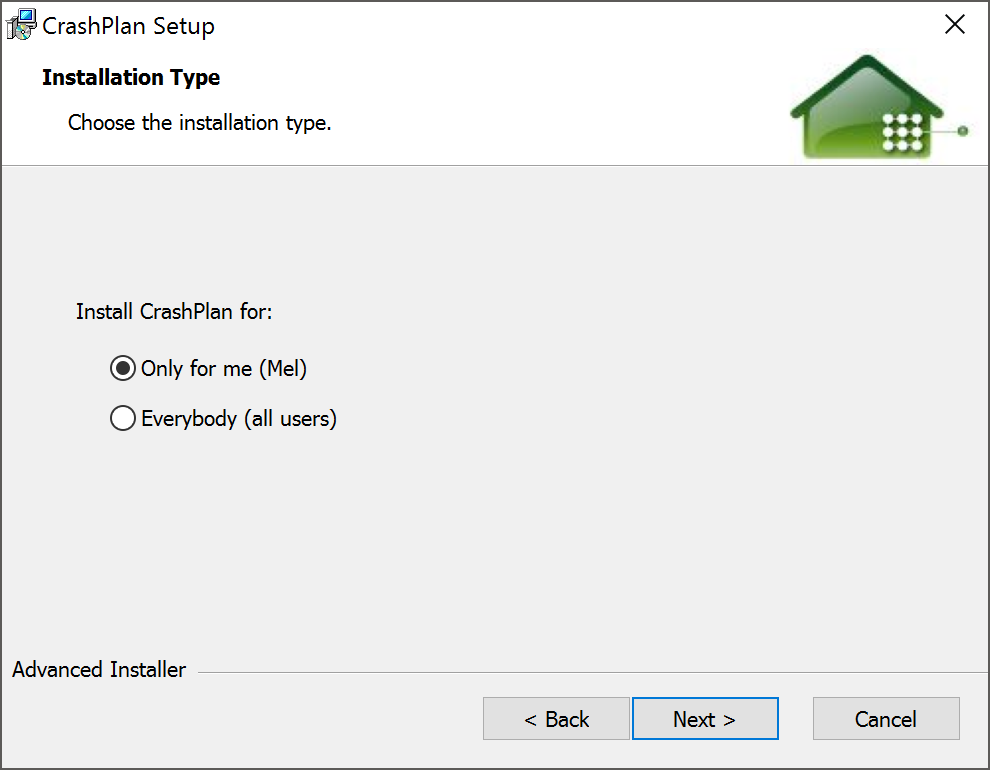
Install or re-install CrashPlan on your main computer following Code42’s per-user instructions. Basically, uninstall CrashPlan if it’s already installed, and then re-install choosing “Onlyfor me” when prompted for an installation type by the installer.
You’ll need to go through the whole CrashPlan setup process again, signing in to your account, providing a password, etc. If you were backing up to an external hard drive, then you should “adopt” that backup to avoid starting over from scratch.
Once you’re past all of that, you can now add the new, mapped network location as a destination.
After this, it’s business as usual. When your computer is on the home network, CrashPlan will see the mapped drive and back up to it. If your computer is portable, then when you’re on another network the drive will simply not be available, and CrashPlan will stop backing up until the mapped drive is available again. There’s one little wrinkle, though. If CrashPlan notices that a folder destination has gone offline, it doesn’t seem to be very good at noticing when it comes back. This presents a problem for laptops, and may require you to restart before CrashPlan will notice the location and start using it.
It’s not quite as nice as having a real remote CrashPlan instance, but it will do for now, and won’t break when Code42 pushes out an update every week. Windows may complain that not all mapped drives could be reconnected when you sign in, and you may have to reboot for CrashPlan to see the network location, which can be kind of irritating. But it works, and, more importantly, will continue to work. It just takes a little more hand-holding. If you’re backing up from a computer that’s always on the home network like a desktop, then this won’t affect you.
I’ll keep evaluating this approach, and hope that a better solution comes along, but this’ll get you a working backup solution until then.

Hi, I can see one problem here: you can have your backup destroyed from within the computer you are backing up. For example, the virus can look at the network (mapped) drive and remove all files, or some ransomware can spoil your backup…
Yes, that could definitely happen. Even with CrashPlan running normally though, you’d have a similar issue. If you delete a file from your drive, the next time CrashPlan runs, it will throw it out of the archive as well, so if you were hit with a virus, even normal CrashPlan would still lose your files, it just might take a little longer. If you didn’t notice that something had deleted all of your music until after the next backup run, you’d still be out of luck. That’s why I recommend making a separate “cold” backup on a removable drive. I have an external drive set up as a CrashPlan destination. Once a month or so, I hook the drive up, kick off the backup, and let it run overnight. Once the backup is complete, it goes back in the fire safe. I might lose a month of stuff, but it’s better than losing it all.
This should work to back up other PCs to the share on the Pi, but a bigger problem is that Crashplan no longer runs on the Pi, so the PI itself and shared files on the Pi need another different backup solution. It was pretty nice to have one backup solution running on all my machines. Any suggestions? Rsync cron job to an external drive?
I continue to run Crashplan on my Pi and PCs, after hacking Crashplan as you say, to keep it on the last rev that ran on Pi. The Crashplan backup target for the Pi is an external drive connected to my main PC, rotated weekly, so I never have to deal with external drives directly on the Pi.
Disabling updates on an older version of CrashPlan will work for now, but eventually the desktop version will probably stop talking to it when their versions drift far enough apart. That’s why I’m not trying to keep it running on the Pi at the moment. Unless code42 has a change of heart and starts distributing ARM binaries, I just can’t trust it.