
Note: This post is part of a series. Each post builds on the previous ones. If you are just trying to add one thing to an existing system that was not built following this series, then I cannot promise that these instructions will work for you, although they probably will. If you’ve started from something other than a non-NOOBS Raspbian image, then you’ll probably need to adjust for that.
Please refer to the series Introduction for a list of all the different posts in the series.
Self-Promotion: I have recorded this series as a screencast for Pluralsight:
(http://www.pluralsight.com/courses/raspberry-pi-home-server)
If you have a Pluralsight subscription, please consider watching it. Reading the instructions is one thing, but watching it done demystifies the whole process.
Thank you!
At this point in the previous version of this series, I demonstrated both mounting a hard drive and booting from it. After building and rebuilding this server many times as part of maintaining this series, I found that booting from the hard drive this early in the process makes the rest of the series inconvenient because you can no longer take backups of the whole system by simply taking an image of the SD card.
As a result, booting from the hard drive is now a separate post, and one of the last in the series. I found this to be much more user friendly, and simplifies things if you mess something up and want to rewind to your last “save point”. We’ll get everything set up and working first, and then transfer the OS to the hard drive in this version of the series.
Gather your tools
This post uses some software packages that are not included by default in the Raspbian distribution. You’re going to need NTFS filesystem support, and the gdisk tool. Install them before continuing. One or more of these tools may already be installed on your system, but telling apt-get to install something that’s already there won’t hurt anything.
sudo apt-get install ntfs-3g ntfs-config gdisk
Pick a hard drive
Pretty much any external USB hard drive will do. For my own server at home these days, I’m using a 120GB SSD for my OS drive, and a dual-drive 2TB RAID enclosure (Cavalry CADA-SA2) for my data. This might seem like overkill for a Raspberry Pi, but one of my home server’s jobs is to centralize and share my music collection. It took me four solid weeks to rip every CD I own, and I do not plan to repeat that process. My family photos and videos are on the RAID drive as well. Basically, this is all stuff I don’t want to lose due to a hard drive failure.
Note: Yes, I have a separate offline backup too, but swapping out a dead drive in a RAID array is easier (and faster) than rebuilding the whole thing by hand from a backup.
Linux device names
Before we start, lets take a moment to discuss the way in which Linux refers to devices in general, and more specifically the way it refers to hard drives. Windows users are used to seeing multiple drives show up with different letters. You have your “C” drive, where Windows and all of your programs are installed. Maybe you also have a second hard drive called “D”, or maybe “D” is CD or DVD drive on your computer. “A” and “B” used to refer to floppy drives, and are reserved for historical purposes. Each of these devices is completely separate island of stuff.
Linux has no drive letters. Linux uses what’s called a “unified file system”, meaning that files, folders, and even entire drives appear together under one root. You can see all of these different devices in the “/dev” folder. Take a look:
ls /dev

I won’t go into what all of these entries mean, but you can see that there are a lot of them. If I were to plug in an external hard drive, or perhaps a flash drive, I would see new entries pop up in the list. Here’s another screen shot after I’ve plugged in a flash drive.
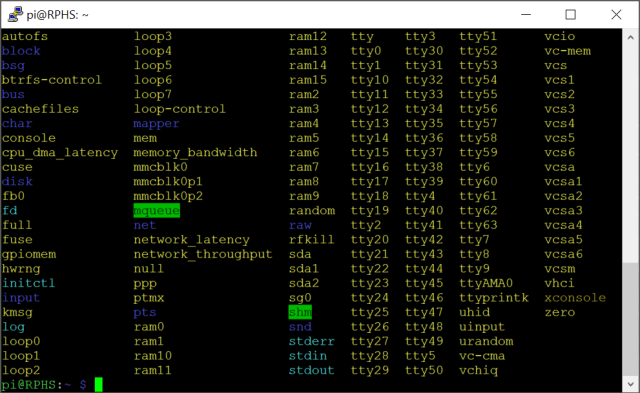
Look about halfway down the third column, and you’ll see new entries called “sda”, “sda1”, and “sda2”. These represent the flash drive, and the two partitions it contains, respectively. You’ll most likely only see one partition on a typical flash drive, but this one has two partitions for demonstration purposes.
Storage devices like a flash drive or a hard drive can be divided up into multiple sections called partitions that can make it appear to be multiple physical drives. This list of where each partition begins and ends is called the “partition table”, and every drive has one.
That explains the “1” and the “2”, but where did that “a” come from? On a computer where drives are connected via SCSI (Small Computer System Interface), “a” would be the first device, “b” would be the second, etc. Drives connected via IDE (Integrated Drive Electronics), or SATA (Serial AT Attachment) have similar concepts of “first”, “second”, etc.
This is not the case with USB. USB devices have no concept of “first” or “second”. The USB ports on your computer aren’t numbered, at least not externally. You could plug the same device into any USB port and it should work just the same. USB device names are assigned on a first-come, first-served basis. The first drive to be ready gets to be “sda”, the next one “sdb” and so on. If you plug in a third device, you could expect it to be called “sdc”.
If you only have one drive, then it would obviously always be called “sda”, and there’s no problem, but since you’re building a server, it’s conceivable, and even likely that you will eventually end up with more than one hard drive attached to it. Perhaps one drive will house videos, and another one will have music on it.
Even if you don’t see a need for that yet, you’ll end up filling up a drive eventually, and you’ll want to add another one. As soon as you add more USB drives, however, you can’t count on their names being the same every time the machine starts up. As a result, drives may end up mounted in the wrong places, and programs won’t find their files where they expect them to be because the drive that used to be “sda” was a little slower off the line one morning and got stuck with the name “sdb” instead.
Let’s take care of that particular problem before going any further.
Format the hard drive
If the drive you’re planning to use already has stuff on it, then back its contents up somewhere. and restore them when you’re done. This approach calls for nuking and repaving the whole hard drive.
Caution: Even if you wanted to live dangerously and manipulate the partitions in place, I wouldn’t do it without a backup copy first. There are just too many things that could go wrong. What if the power went out partway through the process? Don’t risk it. Just copy your stuff to another drive, and copy it back when you’re done.
The key to fixing the device naming problem requires us to have a specific kind of partition table called a GUID Partition Table. This is different than the older Master Boot Record which is used by most smaller drives or older Windows machines.
In order to create a GPT, you’ll need to use Linux’s Partition Editor (parted) application. Raspbian already includes parted, so there’s nothing to install. Without hooking up the hard drive just yet, run it with the following command:
sudo parted
You should see something almost, but not quite entirely unlike a command line. To see a list of all the known devices and partitions, type “print all”. Parted should print out a table with two rows similar to this:
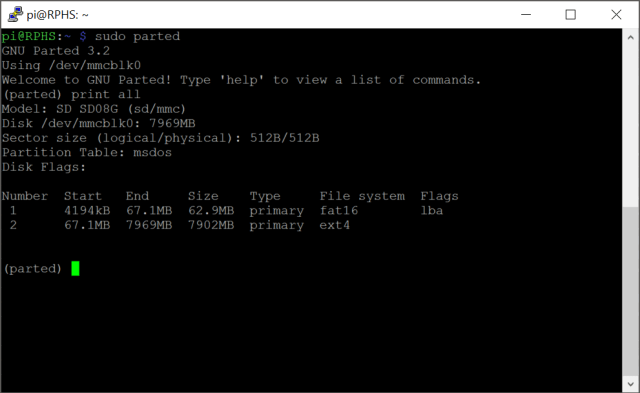
The rows in the table represent the partitions. The columns will tell you where each partition begins and ends, how large it is, and what kind of filesystem it contains.
If you see more than one table at this point, then you probably have another drive plugged in somewhere. I strongly advise shutting down and removing all drives other than the SD card before continuing.
The SD card in the image above was created using the Raspbian image file, and has two partitions on it, a small “boot” partition, and the root filesystem partition. If you started by using NOOBS, which you really shouldn’t, then you probably have five partitions. Future releases could divide things up differently, so don’t worry if your output doesn’t look like the example.
I’ll say it again here, but I really don’t recommend building a server from a NOOBS image. NOOBS is convenient for experimentation and classroom use, but it complicates a server build without adding anything of value.
Attach the hard drive
Shut down, plug your external drive into a free USB port on the Raspberry Pi, and restart.
Note: You could try plugging in the drive with the Pi running, but unless the drive has its own power supply, this might draw too much power and cause the Pi to restart involuntarily.
If you’re booting to the desktop, then there’s one more thing you need to do. When running the desktop, the Pi will auto-mount devices in a folder called “media” under the root. Take a look at what’s there now.
ls /media/pi
You’ll see different stuff depending on what the drive used to be used for. The point is that the drive is “mounted”, and that’s going to prevent us from formatting it easily. If your drive has more than one partition on it, you can expect to see more than one thing in the /media/pi folder.
Un-mount the devices one at a time like this:
sudo umount /media/pi/NAME
Where “NAME” is the name you saw listed above.
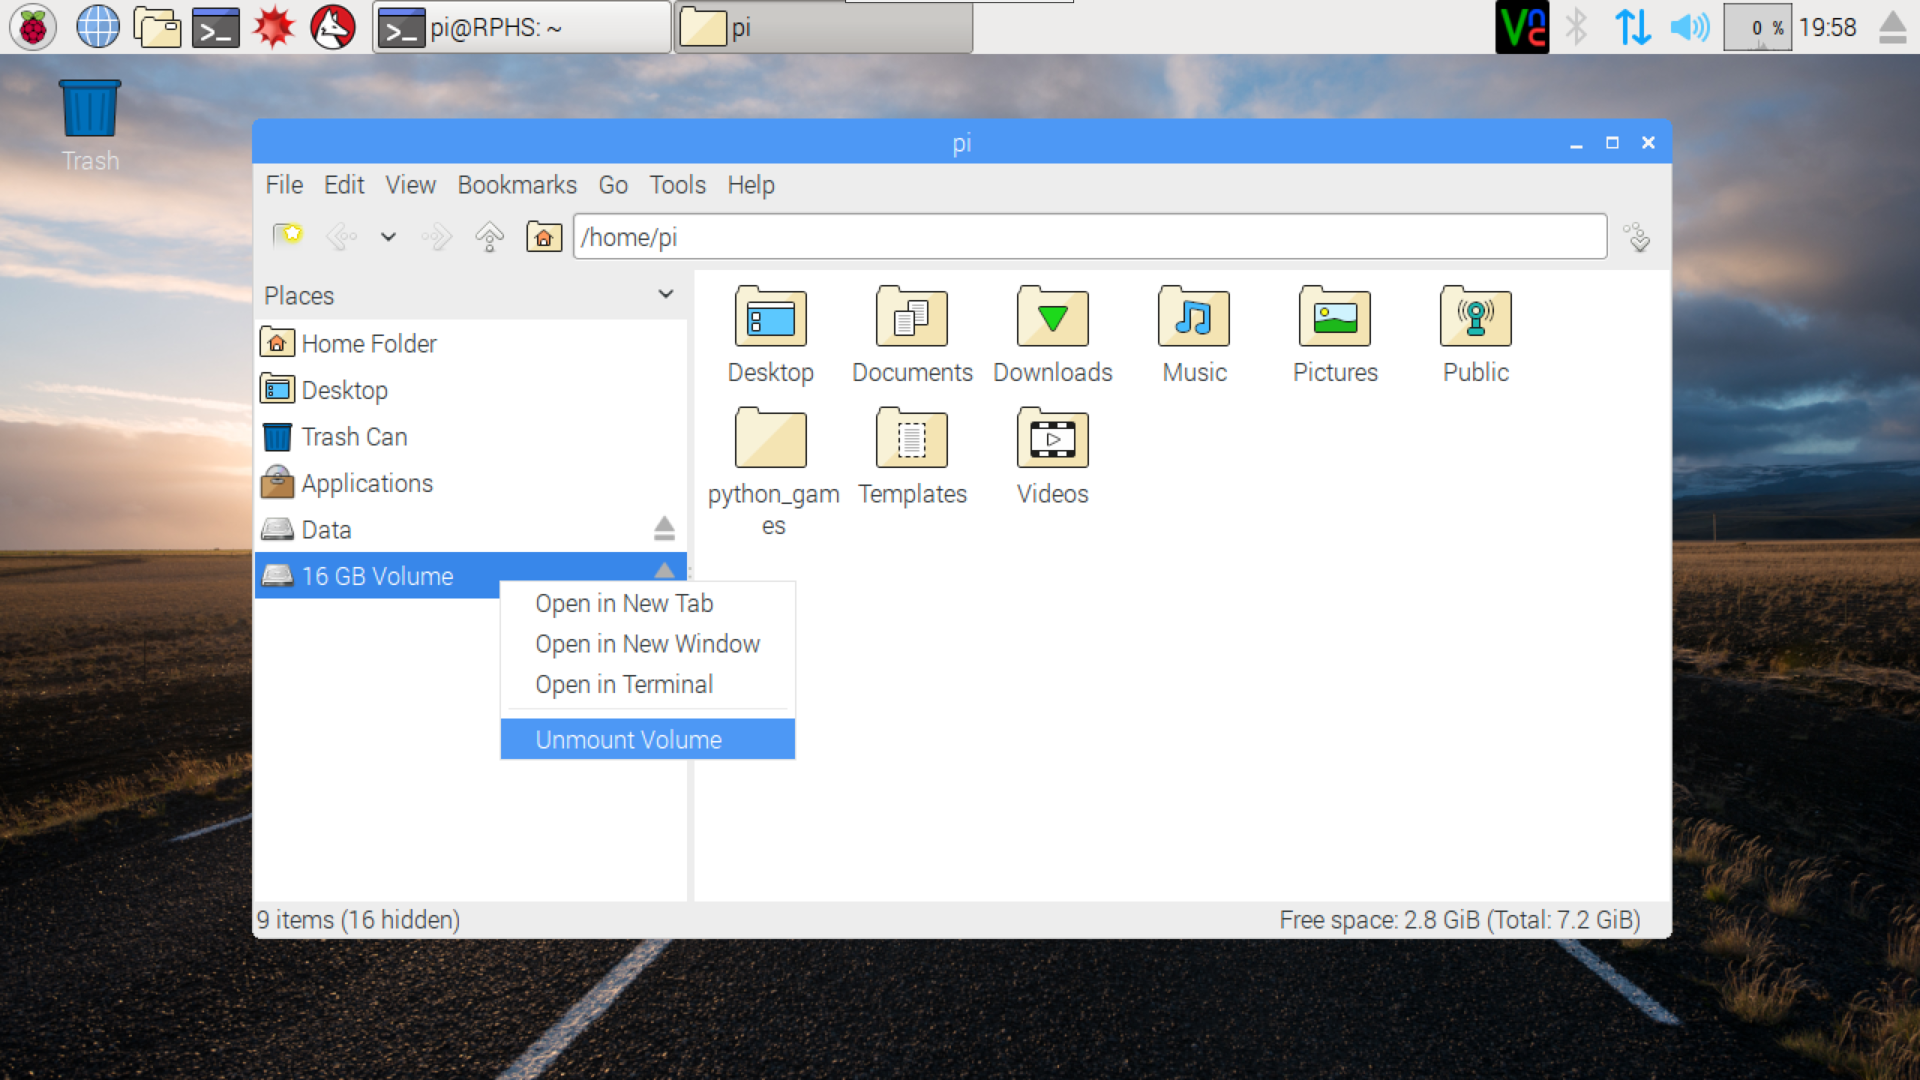
You can also do this from the desktop using the “File Manager” application. Open it by clicking the Menu icon, then “Accessories”, and then “File Manager”. At the top of the left pane should be a drop-down labelled “Directory Tree”. Switch that to “Places”, and any mounted devices should show up at the bottom. Right-click on your devices and then “Unmount”.
Run parted again
sudo parted
List the known partitions again.
print all
This time, you should see two tables like this:
 In my example, the second one is the external drive, although the order is not guaranteed here.
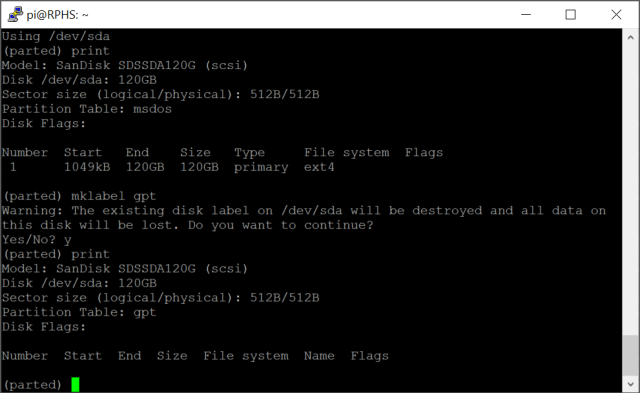
Notice the headers above the tables. The header tells you information about the drive in general. In this case, the header tells us that the hard drive I’m using for this demo was assigned the name “/dev/sda”, that it’s 120GB in size, and that its partition table type is “msdos”. That means it’s using the old MBR-style partition table, and that’s not going to work for this server.
Select the external drive by typing “select /dev/sda”. Type “print” all by itself to make sure. You should see the second table from above again. Read the header carefully, and make sure it’s referring to the external drive, because you’re about to blow away the partition table.
Create a new partition table with the command “mklabel gpt”. Read the warning carefully, and make sure it refers to “/dev/sda”.
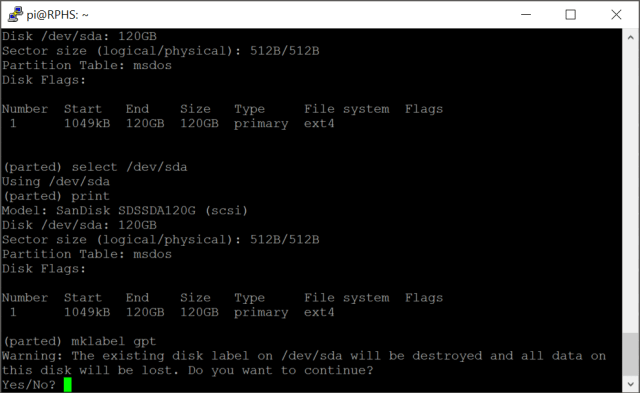
Answer “y” to the prompt, and in a few seconds, you will have a nice blank slate to work with. Check the results with another “print”. The header should now say that the partition table type is “gpt”, and there should be no partitions on it.
Create new partitions
Next, you’ll need to create two new partitions; one to hold the root filesystem, which I will cover later on in the series, and one to hold your data. You could make one big partition, combining the root filesystem and data storage in one, but there are some benefits to keeping the data partition separate. The root filesystem must be formatted using Linux’s native filesystem, ext4. The data partition, however, can be any type you want, which means you can pick something that other, non-Linux computers will understand.
Root Partition
This is where Linux and your programs will go later on in the series. You can think of it as Windows’ C: drive. The size is up to you, but 16GB is probably fine for the simple server described in this series. If your existing SD card is larger, or you are planning to install a lot of programs, go bigger. Just make sure the partition is at least as large as the SD card you are currently using.
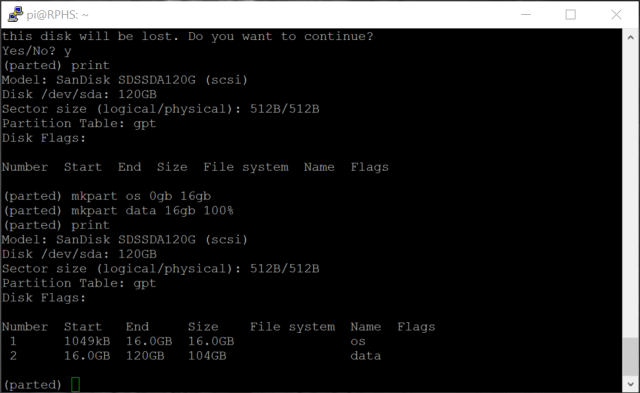
Create a new, partition starting at the beginning of the drive:
mkpart os 0gb 16gb
Substitute your own value for 16gb so that it matches or exceeds the size of your SD card. I recommend going slightly larger than your SD card, myself, just to be sure everything fits. I typically build on an 8GB card, but create a 16GB partition on the drive.
Data Partition
This is where you’ll put your “stuff”, and it should take up the rest of the available drive space. The mkpart command can interpret the beginning and ending parameters in a variety of different formats. Use this ability to create a second partition that begins where the first partition ends, and takes up all the rest of the space on the drive:
mkpart data 16GB 100%
Finally, use the “print” command again to see the results.
That’s it for the partitions, so type “q” and press enter to exit parted. You can ignore the warning about updating /etc/fstab for now. We’ll get to that soon enough. You now have two partitions, but they’re completely blank at this point.
Format the data partition
Before you can store anything on a partition, you need to format it. Choosing NTFS as the filesystem will allow you to simply plug the drive into any Windows, MAC, or Linux desktop computer and manipulate the drive contents. This can be especially helpful for loading up large amounts of data, such as the family’s music and photo collection, without having to squeeze it all through the network connection. If your main computer is a Mac or another Linux machine, then this may not matter as much to you since those systems understand ext4.
Format the second partition as follows, filling in whatever name you want the partition to have. I’ve called mine “Data”.
sudo mkfs.ntfs -Q -L Data /dev/sda2
Note: Don’t forget the –Q (Quick) or you’ll be waiting around a while.
At this point, I would shut down the Pi, attach the hard drive to your regular computer, and make sure you can read the partition. In some recent versions of Windows, partitions formatted as NTFS on a Linux system may fail to mount. This has happened to me on some drives and not others, so make sure you check yours before moving forward. If the drive doesn’t show up in Windows, start up Disk Management (Windows key, type “disk”, and click on “Create and format hard disk partitions”). Find the data partition you created above, right-click on it, and let Windows format it itself. This will ensure you have the best compatibility moving forward.
Uniquely identifying a filesystem
Warning: Because the next section involves copying around large strings of unmemorizable data, I recommend performing the steps through a remote SSH window, or from a terminal window on the desktop either directly or via VNC. The Ids you’ll need to copy need to be copied verbatim, letter for letter, or you’ll find yourself unable to boot, and you’ll have to start over again from your last backup.
As I mentioned earlier, just because the data partition is called /dev/sda2 right now doesn’t mean that it will have that name in the future if you add more drives to the system. What we need is a way to uniquely refer to this drive no matter what letter it get assigned on any given day.
This was why we built the drive with a GUID Partition Table. Each partition on a GPT device is assigned a universally-unique identifier (UUID).
Note: The difference between GUID and UUID is not important here, they are, for all intents and purposes, the same thing; a very long, randomly-assigned number.
Instead of identifying the filesystem’s partition by location, we want to refer to it by Id so that it can be found no matter what order the drives were discovered in. Use the “blkid” comman to find out more about /dev/sda2 (the data partition):
sudo blkid
You should see a listing of information about all of your drives and their partitions, like this:

The piece of information we’re interested is the “UUID” of sda2. In my case that’s on the next to last line of the above screenshot, not the “PARTUUID” on the last line. If you partitioned your drive differently, for instance putting the big partition first, then you’ll need to adjust accordingly. You can double check this using parted and the “print all” command again to be sure.
Note: PARTUUID uniquely identifies the partition, and will come into play later on when we boot from the hard drive. “UUID” identifies the filesystem on that partition, and it’s what we need for mounting.
Take a picture, write it down very carefully, or select and copy the text if you are doing this through a remote terminal connection like I am. If you’re on the desktop directly or through VNC, you could also open up the built-in desktop text editor, and paste the UUID there. You can find it at Menu -> Accessories -> Text Editor.
Mounting filesystems
Linux has assigned the name /dev/sda2 to our data partition, but you can’t just use that name to refer to it. In the Linux world, you first need to tell the OS where that filesystem belongs in the grand scheme of things. To do this, you’ll need to edit the filesystem table. This file controls what gets mounted where, and in what order. Take a look at the current contents.
cat /etc/fstab

The second line is the boot partition, where things like config.txt and cmdline.txt live. The third line is the root filesystem, which you can tell by the “/” in the second column. At this point, it’s loading from the 2nd partition on the SD card (mmcblk0p2). We’ll come back to this in a later post and change it to the OS partition on the hard drive.
Edit the fstab file:
sudo nano /etc/fstab
Add a new line after /dev/mmcblk0p2, but before the comments. The first column identifies the partition. You’ll need to use the format “/dev/disk/by-uuid/” and then the UUID you copied down above. Press TAB, and the path to the location in the filesystem where you would like the partition to mount. I recommend /mnt/data. Tab again, and specify the filesystem type. If you’re using NTFS, just put the letters “ntfs”, if you’re using ext4, type that. Tab again and type the word “defaults”. Tab again and type a zero, then another tab and another zero.
The end result should look like this:

NOTE: I’ve replaced the tabs with spaces to fit it on one screen, either one works just as well. You can pretty up the columns so they line up if you like.
Exit Nano, saving your changes (ctrl-x,y,enter)
The next time the system reboots, it will try to mount the hard drive at /mnt/data. Before that can succeed, you need to create a folder in that location. You can think of it as a placeholder where the actual drive will appear later on.
sudo mkdir /mnt/data
To prove that the drive mounts successfully, create a file in the new folder using the “touch” command.
sudo touch /mnt/data/placeholder
Look at the folder’s contents
ls /mnt/data
You should see a file called “placeholder”. If you ever look in this folder and see that file, it should act as a warning that the drive has not mounted properly.
That’s it. you’re ready to reboot the Pi, and start using your new data drive.
sudo reboot
When the system has rebooted, look at the contents of /mnt/data again.
ls /mnt/data
Instead of the placeholder file, you should see an empty drive. If you formatted the drive as ext4, you’ll see a lost+found folder, but nothing else. If you see the placeholder file, then something has gone wrong. Verify your changes to fstab, and see if you skipped a step, or used the wrong UUID above.
Wrapping up
You now have an external drive to store your stuff in, and it should mount in a predictable place every time the server reboots. The next few posts will start taking advantage of this new storage space.
Shut down the Pi, and take a backup of the SD card.
What’s next?
In the next post, we’ll put the new drive to work sharing files over the local network.

I just spent an hour trying to figure out why mkfs.ntfs wasn’t working….you need to install ntfs-3g to get the command to work.
It looks like the “Gather your tools” paragraph got dropped somewhere along the way. I’ve added it back in. Thanks for the heads-up.
Howdy..using the uuid of my drive it always mounts the small partition the 16 gig partition not the 500 gig partition..have repeated these steps for hours..not sure what I am doing wrong?
Thanks in advance Lynn
Off the top of my head, I can think of two things. First, make sure you’re using the correct UUID. There are three to keep in mind. One is the Id of the partition Id, which is used to BOOT from the drive, but since that’s a later post in this edition of the series, I’m assuming that’s not what you’re doing yet. The other is the Id of the filesystem ON that partition, and that’s the one you want for mounting the filesystem using fstab. When you run “sudo blkid”, make sure you’re grabbing the UUID (not PartUUID) of /dev/sda2 (not sda1). I realize that my instructions point to the UUID by position, not name. I’ll go take care of that now. Of course, if you’re trying to mount more than one device, you’ll need to adjust accordingly. The important thing is to carefully identify the UUID of the filesystem you’re after. You can use parted, and the “print all” command again to get a look at exactly what you have going on. If you partitioned your drive differently, for instance putting the big partition first and THEN the small one, then you’d also need to adjust accordingly. Just make sure you’re grabbing the UUID of the BIG partition, and mounting that.
Howdy again..it is now working just fine..I think I probably had it right a dozen times but I was not understanding it correctly I was expecting to ‘see’ a harddrive when it was just a folder but I also now have the MiniDlna working fine..Question ..how to add a loaded drive? or does it have to be empty like the first one?..Thanks for a great set of lessons
Lynn
Hi and a bIG THANks for a great tutorial. I also have the same Q as Lynn have posted. Or what do I have to do if I would like to ad another HD to the PI? Thanks again! RegardsAnders
It’s the same exact thing. Hook it up, figure out what device name it got, format it if needed, get its uuid, and add it to fstab. You won’t need two partitions, but other than that the process is the same.
Well this is about to drive me insane. I have been trying this for the last three days. When I iniitially connect my HD it is visible in the desktop file manager. When I make the fstab change with the UUID, it boots but it is not visible on the desktop. I seem to be able to read and write to on the command line but I cannot access it from file manager. What am I missing?
Where are you looking? The desktop environment will auto mount the drive, and you can see it in the file manager, but not in a way that’s permanent or predictable one more drive come into play. If you’re following the post, then the drive should appear at /mnt/data after rebooting. It won’t be on its own at the bottom of the list anymore because it’s been given a specific spot in the filesystem now.
The drive shows up in the device list but not in the places list. If I have not doen the UUID step, I see the partition(s) in the list of places with whatever files and folders it might have.Once I make that change, that part dissapears.It still shows under devices but not places. If you boot to the command line and never start the desktop, this problem would not be noticed. I plan to go further so that I can see it on my network to see if it is functional. In all probability, this is a desktop bug but it leaves me concerned that it may mean more.
I don’t spend a lot of time in the desktop environment, but that sounds normal to me. The Places list is a convenience for getting to things like flash drives that you plug in on-the-fly. Once you’ve set something up in fstab to give it a permanent home, it stops showing up in Places, but will appear where you mounted it (e.g. /mnt/data). I don’t know if this behavior can be changed, but it makes sense to me. The Places list is kind of a catch-all for things that don’t have an assigned “home”. You wouldn’t want to have to manually mount every flash drive you plug in before using it, although that’s exactly what you’d have to do if there were no desktop file manager.
Well then, yes, it makes “sense”. I never did think the whole mount-unmount idea made much sesnse anyway. Now i have to figure out how to find the /mnt folder from the desktop. Appreciate the work, especially the second revision. Don’t stop now…
Instead of “places” in the drop down, choose… Crap, I can’t think of its name right now… The other one. That’ll let you see the whole filesystem.
It’s “Directory Tree” 😉 and it seems to be good for now. Thanks again!
Hi,
I have recently become aware that it is possible with the latest release of Debian to boot from HD with no dependance on an SD card.
See : https://www.maketecheasier.com/boot-up-raspberry-pi-3-external-hard-disk/
Are there amendments we can make to your RPHS setup that will enable us readily to do this ?
Regards
Denis
The last I checked, this is still considered beta. Only the pi3 can do it, and not all hard drives or flash drives will support it. When it’s considered “done” I will be covering it for sure.
Good 🙂 .
I’ll wait with interest .
Regards
Denis
Mel, after going through these instructions multiple times on my Raspi Zero PiDrive NAS, and getting “permission” errors each time, I finally entered these commands:
sudo chown -R pi:pi /mnt/data
sudo chmod -R 775 /mnt/data
and now it works!
Are those commands necessary, if I’ve followed your instructions correctly, or did I just miss something obvious?
Great article. My Raspi B+ NAS with 4 external drives, built with your ver. 1 article is trucking along a year on with no problems.
Thanks,
Kirk
Mel, Excellent, excellent series. Very well written and thorough. I have been running a RPi NAS for a few years. I solved the multiple drive problem by labeling the drives when formatting (format NTFS on Windows and set drive [partition] label). Then I use the LABEL= option in /etc/fstab or mount command. I label my drives by manufacturer, size and serial, e.g. SG2TB1 for the first seagate 2TB drive, WD1TB3 for the third western digital 1TB drive (and put a physical label on as well). I found this to be easier than UUID and less prone to error. So far, I haven’t encountered any problems, but was wondering if you felt there was a downside to this (LABEL=) approach, or had other reasons for going the UUID route. Thanks.
Multiple hard drives with the same label, I guess. I can definitely foresee more than one drive called “data”. I have several myself just from maintaining this series. You should see my SD card collection.
When I do cat /etc/fstab before adding the hard drive both partitions of the sd card are identified by PARTUUID not /dev file name as you have indicated. Does this matter and if so, how can I fix it?
Yes, this seems to have changed with the Stretch release of Raspbian. It shouldn’t affect what you’re doing with the hard drive though. It’s a better choice in the long run, too.
I’m pretty sure you can use the same syntax to identify your new drive as well. Instead of disk/by-uuid, you should be able to simply use PARTUUID as well, and then use the “Partition UUID” reported by blkid, not the UUID (which identifies the file system ON the partition). Since Stretch just came out, I haven’t had a lot of time yet to go through the whole series end-to-end, but that should hopefully change after this weekend. If you want to try out the PARTUUID syntax in fstab, make sure you take a backup of the card first. It’s the fastest way back if something goes wrong.
🙂 Thank you! We must have been typing messages at the same time. I used PARTUUID and followed the rest of the instructions and it all worked as described. I’m curious though, how do I know that the data partition is actually available to use for anything? I don’t see it in the file system.
Oh, and thank you so much! This series of articles is amazingly helpful!
It should just show up as a directory wherever you mounted it. You may or may not have to manually create the placeholder directory first these days. My data partition mounts at /mnt/data, so I’d just “cd /mnt/data”, and start making files.
So, it’s ok to mix partuuid and uuid in fstab or should I use partuuid like they did?
You can mix and match all you want. The way it worked before the “Stretch” release was already a mix of /dev/mmcblk…. and /dev/disk/by-uuid syntaxes. I don’t have a Pi in front of me right now, but I used the PARTUUID syntax on at least one experiment right after Stretch was released, and it worked fine. Just take a backup first, especially when messing with fstab.
I am following your tutorial, I think there may be some difference in a newer version of raspbian. I mounted my HD at /mtn/data but when i use the command ls /mnt/data nothing shows up. When i go to the file manager the data folder shows open space 425 GB (the amount of SDA2) is this the right way?
How about “ls /mnt”? Is there anything there at all? There have been some changes in raspbian that make some things a little simpler, but the existing instructions should still work just fine.
yup there it is. I honestly get so frustrated when these things happen; however, I know that in a few minutes/hours/days ill get a breakthrough and figure it out. I live for those. Thanks for all your efforts and support. I have a follow up Q coming…
i took my external drive out of the pi and stuck into my windows machine. When I open up disk management I am not able to format the drive, nor does the drive pop up in my file manager. Any thoughts? Thanks for your quick replies.
If you formatted the drive as ext4 from the Pi, then Windows doesn’t know what to make of it. An ntfs drive should work with both though, at least once the proper drivers are installed on the Pi.
sorry for all the questions, but I dont know even know where to start to answer this other than asking. I got my first HD set up everything works can transfer and everything. I then try to set up other HDs: I shutdown and plug in another external HD start up and i first hear the new HD make a clicking sound. I find out that my first HD is no longer mounted at /mnt/data i try to follow the instructions but its like nothing is there. I try sudo blkid and nothing, not even the first HD is present. I unplug the second HD and then everything goes back to normal. i run sudo blkid and the first HD is there. Any thoughts? Also, since I transfered the os to the external HD can i remove the sd card?
Are you trying to power the drives entirely from the Pi? Maybe they’re not getting enough power. For them to work individually, but not together sounds like a power problem to me.
i forgot some information. When I plug in the second HD the first HD at /mnt/data disappears but they both can be found at /media/pi. However still when running sudo blkid neither of them appear.
If they’re both showing up under /media/pi, then I think we can rule out power problems. This is just a shot in the dark, but do the two drives and/or filesystems perhaps have the same UUIDs? Maybe when the second one comes along and has the same Id as the first, the OS just punts and treats them both as removable media since they can’t both be mounted to the same place. I’d suggest taking this one step at a time. Make sure that when you plug in just the first drive, that it behaves the way you expect. Then do the same for the second drive. Make sure to use blkid to get the UUIDs of both the partitions and their filesystems individually. Then see if there’s a collision. Finally, try to get both connected at the same time again. I have multiple drives connected to my server, and it hasn’t had any problems at all. Both drives are permanently mounted using fstab using their UUIDs.
Hi there. An excellent tutorial, thank you. Just a question.
I added one usb stick and one HDD – all working fine. But when I disconnect either of them and reboot the Pi, it gets stack. First, it tries to mount the missing drive (expected) then after some time out it carries on and ends up with an error message – complaining about root account locked. Then there is no way to recover the Pi, no IP is assigned… If I plug in the drive back and reboot everything is ok.
Anybody noticed the same behaviour? Can be a missing drive safely ignored?
Thank you.
If you just let things mount under /media/Pi, and don’t set anything up in fstab, then it won’t care when they’re missing. When you mention drives in fstab, however, you are making a promise that they’ll be there. There may be a way to make them optional, but in my experience, Linux doesn’t like it when drives are missing that it expects to be there.
Fantastic so far. But could you move the bit about not using NOOBS to the OS installation section. I got all the way here before I saw the much more stronger language and rationale, went back and started over. Thanks!
NB: I ran into the problem where Mac OSX and Windows 7 would not recognize the NTFS partition as such. When I went to a Windows 7 machine, I found that I could not use the disk manager to format the partition. Instead, I deleted the ‘volume’ and replaced it with a ‘simple volume’ (which is essentially a partition in the new Windows terminology). The Pi recognizes the new ‘volume’ as an NTFS partition.
For a drive that’s going to live its life attached to the Pi, I always blow away the partitions and start from scratch. There are just too many variables. The next time I rebuild, I plan to make the jump to ext4 as well. I realize that I’ve never actually needed to pull the drive from the Pi and attach it to my regular computer. Not once. Plus, I have a bunch of raspberry pis that can read it in a pinch.
The latest version of the Pi OS doesn’t show “Places” in the File Manager, by default.
If you want to see and use it, as I do, you need to go to File Manager/Edit/Preferences/Layout and uncheck “Display simplified user interface and menus. That will put the Places option back in the dropdown at the top of the left pane. Why did they change it? Ya got me. Maybe they’ve been infected with the MicroSoft “if it ain’t broke, fix it until it is” virus.
Hi Mell. It’s been years since I followed your tutorials and everything was fine, until my external harddrive died today.
Luckily I have multiple backups, so that’s not an issue. I’m now going to follow along again so I have a change to see what’s changed. I was still on wheezy.
Instead of adding one drive, I would like to run the OS of a USB stick, and add a USB drive for the Data. Can I just create one 100 % partition for the OS on the stick, and than later add the second USB drive ?
Absolutely. I save some space on the drive because they are generally more durable and faster than your average hard drive.
Wow. Thanks autocorrect. I save space on the hard drive because they are faster and more durable than flash drives.
Ok sorted, thanks !