
Note: This post is part of a series. Each post builds on the previous ones. If you are just trying to add one thing to an existing system that was not built following this series, then I cannot promise that these instructions will work for you, although they probably will. If you’ve started from something other than a non-NOOBS Raspbian image, then you’ll probably need to adjust for that.
Please refer to the series Introduction for a list of all the different posts in the series.
Self-Promotion: I have recorded this series as a screencast for Pluralsight:
(http://www.pluralsight.com/courses/raspberry-pi-home-server)
If you have a Pluralsight subscription, please consider watching it. Reading the instructions is one thing, but watching it done demystifies the whole process.
Thank you!
Now that you’ve turned your Raspberry Pi into a working computer, it’s time to get connected.
Prerequisites
- A Raspberry Pi with the Raspbian Linux distribution installed as described in the “Installing the OS” post earlier in this series.
- You should be logged in as the “pi” user account.
- You need to be at a command prompt. If you set your Pi up to boot to the command line, then you’re already there. If you set it up to boot to the desktop, then you’ll need to open the Terminal program.
Assigning a static IP address
Since this series is about turning the Raspberry Pi into a server, it’s important that it have a consistent IP address so that you can connect to it, and so that you can tell your router where to redirect traffic for things like web traffic or other services. There are two ways to accomplish this.
Method 1: Let the Router Do it
You can use your router’s configuration to permanently “lease” an IP address to a specific device. In other words, you tell your router to always hand out the same IP address to the same device when asked. There are definite advantages to letting your router handle the IP assignments. It centralizes the management of network resources in one place, rather than distributing that configuration across the various devices on the network. Also, there are certain Universal Plug and Play (UPnP) functions that work better if the router is in charge of handling out the IP addresses.
This is the method I use, personally. Instructions for how to configure an individual router vary by manufacturer and model, so I won’t cover them in detail here, but the gist of it is that you associate an IP address with the hardware MAC address of the network card built into the Raspberry Pi.
To get the MAC address, type the following at the command prompt:
ifconfig
The result should look something like this:

The MAC address appears on the first line, next to the label “HWaddr”. Follow the directions for your specific router, and assign a permanent IP lease to this MAC address. Make sure it’s not in the range that the DHCP server uses as it’s “pool”. For my router, everything from 100-255 is the DHCP pool, so anything below 100 is fair game for leasing or static assignment.
Method 2: Let the Pi Do it
The second method is to configure the IP address directly on the Raspberry Pi itself. Here is where you will first start to see the difference in attitude from the Windows world to the Linux world. Windows is about convenience and ease of use for the average non-technical user. Linux is all about highly-knowledgeable users tweaking things exactly the way they want them. Linux settings are stored in plain text files in ordinary folders. The trick is mostly in knowing which settings go in which file, and where it lives.
The Jessie release of Raspbian changed how static IP addresses are configured, so this part is a bit different than in the previous version of this series.
Just like with the router’s DHCP lease-based example above, you’ll need some information first. Type the following at the command prompt.
route -n
You’ll see something like this:
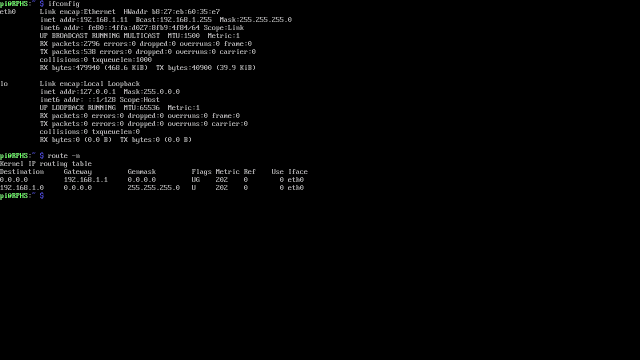
Write down the Gateway address. It’s on the line with the “Flags” value of “UG”. This is usually the address of your home network router. In my case it’s 192.168.1.1
Next, edit the “dhcpcd” file. If you have been building Raspberry Pi servers for a while, you’ll notice that this process is different than it was under the older “Wheezy” release of Raspbian.
sudo nano /etc/dhcpcd.conf
“nano” is a text editor that is included in Raspbian, and is convenient for making configuration changes. You need “sudo” to run it with elevated privileges because regular users aren’t allowed to edit system configuration files, and while it’s certainly above average, the “pi” user is just a regular user at the end of the day.
The dhcp configuration file will open in the editor, and should look like this.

Scroll all the way to the bottom of the file and insert the following lines, substituting the values from above, and the IP address you want the Pi to have where appropriate. For the last value (domain_name_servers), you have a few different choices.
For Google, use the value “8.8.8.8 8.8.4.4”
(Note the space between the first and second addresses)
For OpenDNS, use “208.67.222.222 208.67.220.220”
(again, with a space between the addresses)
If you don’t want to use either of those, you can use whatever your ISP provides you. You can find these addresses in the admin pages of your router, or you can just use the command “ipconfig /all” from a windows machine on your network to retrieve it.
interface eth0
static ip_address={DESIRED IP ADDRESS}/24
static routers={GATEWAY ADDRESS}
static domain_name_servers={DNS ADDRESSES}
Hold down Ctrl, and press “x” to exit nano. It will prompt you to save your changes, press “y” to save them, and accept the default filename, which is the same as the file you loaded to begin with.
Before these changes will take effect, you’ll need to reboot the Raspberry Pi. Type the following and press enter to restart the server.
sudo reboot
Note: If you had just typed “reboot” without the “sudo” you would have been denied. Regular users are not allowed to reboot a Linux machine. Remember that, like Unix, Linux can have multiple users logged in at the same time, and letting one of them reboot the machine when the others might be in the middle of something would be… rude.
Once the machine has rebooted, type “ifconfig” again to see the new configuration. You should see the IP address you assigned listed as the first item on the second row. In this example, the Pi has the IP address of 192.168.1.9.

Going headless
Now that the Raspberry Pi Home Server is located at a known address, you could disconnect the Raspberry Pi from its monitor and keyboard and do everything remotely. Actually, you could have done this a few steps ago, but it’s easier to connect when you know the IP address will be the same each time.
Find an SSH client program that you like, and use it to connect to the raspberry Pi. The particulars of configuring a connection will vary by program, but in Putty, all I need to do is provide the IP address of the computer I want to connect to and click “Open”.

At this point, you could disconnect the Raspberry Pi from your monitor and keyboard, hide it in a closet somewhere, and do the rest of your configuration remotely. I’d recommend leaving it hooked up, though, at least for now. You’ll be setting up a remote desktop a little later on, and it’s nice to have the visual feedback on the monitor to let you know things are working.
I’ll be performing the remaining configuration steps in this series remotely. It makes for better screenshots and is how I intend to interact with the server from now on anyway.
Wrapping up
You’ve reached another milestone, and I strongly recommend politely shutting down the Raspberry Pi (sudo shutdown –h now), and taking another backup image of the SD card.
What’s next?
In the next post, we’ll add remote desktop capabilities.

Hi, thanks a lot for your blog. You might want to update this line:
static domain_name_servers={GATEWAY ADDRESS}
The DNS server is usually not the same as the gateway, so this might not work.
Boot your server using DHCP, then have a look in the nameserver entries in /etc/resolv.conf, these are the DNS IP that were dynamically assigned. It’s better to keep using these DNS when you switch to a static network configuration, so I recommend that domain_name_servers=these IP.
As an alternative, you can use another DNS like google’s 8.8.8.8 and 8.8.4.4 or opendns 208.67.222.222 and 208.67.220.220.
Best regards
I’ll look at it. Probably an oversight on my part. My router acts as a proxy to the real DNS addresses. I can replace the text with a placeholder instead, and make a note of the Google and OpenDNS addresses while I’m there.
I connected both eth0 and wlan0. My router gave them two addresses. So far so good. Now, however, when I go to my FiOS router and try to static assign, it asks for a hostname, not a MAC address. Grrrrrrr. Will have to bury the info on the pi or discon one of the networks, probably the Wlan.