
Important: This is an experiment, and should still be considered preliminary. I’m putting this out there “live” because I know a lot of people are interested in this topic. I’ll be updating this post as the experiment progresses, but just know up front; I’m not promising that this is a viable long-term solution. I have something that seemed to be working, but I’m still testing whether it’s stable or not (and it looks like “not”). Make sure you read all the way to the bottom, and pay attention to the updates there. These will be a running log of the experiment until such time as I’ve determined whether or not this is a viable solution. At that point, you can expect this whole post to be updated with the final results.
Things I’ve learned so far:
- This didn’t work very well at all on a Pi 2, but seemed happier on a Pi 3
- It ran very well on the Pi 3, and then stopped. The basic CrashPlan logs have nothing interesting to say, but the service.log.0 file is positively massive, and not entirely happy
- Just when you’re about to give up on it, it starts working again.
- Just when you think it’s working, it stops again.
Basically, yes, it runs, but not for very long. Maybe it’s a memory restriction, maybe it’s some other instability, I don’t know just yet, but one thing’s for sure. CrashPlan won’t stay running long enough to count.
Ever since Code42 started distributing pre-compiled binaries as part of CrashPlan, I’ve been hoping that they would realize just how many people want to run CrashPlan on Raspberry Pis and other similar devices, and start compiling binaries for ARM processors. I realize that they have no real incentive to do so since their business model relies on subscriptions to their cloud services, but still, it would be nice. That does not appear to be happening, and so I’ve been looking for other alternatives.
My first solution was to configure the Raspberry Pi like any normal file share, and simply use it as a backup location rather than counting on it to actually run CrashPlan. This has been working, but has two major problems.
- It requires a read/write share for storing the backups. If your main computer gets hit with a virus, it could destroy the files in this location, including the backups of other computers. You could mitigate this by creating different shares for different computers, and assigning them different permissions.
- The Pi itself has no way to back up its own files. We can fix this through regular backups of the SD card, or the boot partition on the hard drive, but it’s not automatic.
I’ve been looking for other alternatives, and found something that I thought would work. A company called Eltechs makes a product called Exagear Desktop that is an x86 emulator. I’m not talking about emulating an entire computer the way you would use RetroPie to run an old arcade game. Exagear Desktop is more of an emulated execution environment. I don’t want to get into splitting semantic hairs here, but it’s a way for us to run the regular x86 desktop Linux versions of programs like CrashPlan on the Raspberry Pi. We’re going to take a performance hit, of course, but the hope is that it’ll get us our automated backups again… once the kinks have been worked out.
It’s worth noting that Exagear Desktop is not free. While I’ve been able to pull off everything in this series at little or no cost so far, this is one area where you’ll need to spend some more money. A perpetual license for a single Raspberry Pi costs between $17 and $33, depending on which model of Pi you’re buying it for. In some cases, that’s more than the Pi itself costs, but consider this; A $35 Pi 3, plus a $33 license is still only $68, and uses a penny a day in electricity (not counting the hard drive), so it’s still a cheaper option than dedicating a regular desktop machine to the job. If you have an old leftover desktop machine, then by all means repurpose that, but if you’re stuck on the idea of a CrashPi like I am, then Exagear Desktop may (eventually) be a viable option. You can even try it out for free for three days to see how it performs on your Pi before deciding whether to spend the money or not.
Note: I’m not getting paid for this or anything. When I told them about the blog series, and specifically about me wanting to test CrashPlan on Exagear, Eltechs did give me a longer license for a single machine to do my testing with, but I didn’t get a free perpetual license or anything. If a viable free alternative x86 emulator comes out, I’ll be covering that too. This just seems to be the only emulator that actually works right now. Also, while I was just beginning the process of writing this, they posted their own blog on exactly this topic, so they beat me to it, but I don’t care much for their installation instructions, which are terribly manual, and won’t result in a free trial license, so I’m continuing on with my own post.
I’m examining the possibility that following their strict instructions may result in a more stable system… just not this weekend. I burned all of Saturday trying to coax this thing to life, without success.
Ready? Let’s get started.
Install Exagear Desktop
As I mentioned, there is a blog post on Eltech’s site already (drat, they beat me to it), about getting CrashPlan up and running, but I don’t advise following their instructions for installing their own product because their instructions only work for a purchased, licensed copy, and I’m presuming you want to try it before you buy it.
If you have a license for the product, then following their instructions will possibly get you a more recent version, but installing through apt-get will mean more convenient updates later on. You’ll only get one shot at a trial per machine though. Even if you wipe yourself back to a previous image, the trial will fail on a second attempt. I found this out while trying to verify my installation instructions. Still, if you just want to see how it will behave, this is the only way I know of to kick off the three-day trial period. The regular installation instructions on Eltech’s blog post will not get you a trial, you’ll need a full license for them to work.
First, make sure your Pi is either hooked up to a monitor, or you are connected through a VNC connection. Part of the installation process is going to require you to interact with a pop-up dialog in order to start your trial, so you need to be doing this from a desktop environment. If you already boot to the desktop, then great. Otherwise, you should be able to start the desktop manually with “startx” from the command line. If you built your Pi from a Raspbian Lite image, then you have no desktop, so you won’t be able to get a trial. Sorry. You could probably still install the full version using Eltech’s instructions though, but you’ll need a license.
We’re going to install Exagear Desktop using apt-get, and we won’t even have to go messing around in the source files this time because it’s already in the public repositories. Open up a terminal window, and install Exagear Desktop.
sudo apt-get install exagear-desktop
When the installation is complete, you’re ready to start Exagear, but first, check your current processor architecture.
arch
The output should indicate that you are on an “ARM” architecture. The exact string will vary depending on the model of Raspberry Pi you’re using. I’m installing CrashPlan on a Model 2B that used to be my main server, but got demoted to being the CrashPi when the Model 3s came out, so my output says “armv71”.
Now, start the virtualized x86 environment.
exagear
Since this is the first time we’ve run Exagear Desktop, we’ll get a pop-up asking for contact information, and for us to accept the EULA. Fill in your information, and click “Activate Trial”. After a couple seconds you’ll see a confirmation dialog. Click “close” to dismiss it, and you’ll find yourself back at the terminal window again. Nothing looks any different, but you’re now operating in an x86 “guest” environment. Check the processor architecture to convince yourself this is really happening
arch
It should say i686, which is a total lie, but exactly what we’re looking for. That’s it, we can run x86 Linux programs now. If you really want to get weird, you could even install Wine, and run an emulated Windows environment from your Raspberry Pi. Don’t expect any kind of performance though.
Install CrashPlan Prerequisites
There are a few prerequisites, but we need to make sure we are downloading the proper versions first. Since we’re in a virtualized x86 environment, the repositories that apt-get knows right now are the wrong architecture. Update your sources and install the prerequisites like this:
sudo apt-get update
sudo apt-get install lxrandr libgtk2.0-0 libXtst6 cpio
You can expect this to take a while. The prerequisites have their own prerequisites and so on. It’s prerequisites all the way down. If we were installing things directly on the Pi’s native Raspbian environment, a lot of these things would already be in place. So yeah, we’re going to end up with two copies of some stuff, but it’ll be worth it.
Install CrashPlan
We’re now ready to install CrashPlan, and the instructions are very much like what I originally wrote years ago, only without the hacking of Java files and the swapping of binaries. We’re down to a very clean install now.
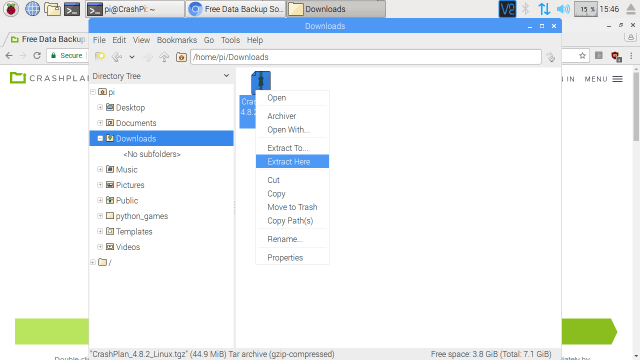
Since you’re already in a desktop environment on the Pi, just go ahead and use the browser to download CrashPlan from https://www.crashplan.com/en-us/thankyou?os=linux. The downloaded file should end up in your Downloads folder on the Pi. While we’re here, we may as well make use of the convenient built-in archiver as well to extract the downloaded CrashPlan_?.?.?_Linux.tgz file. Right-click on the file and select “Extract Here”.
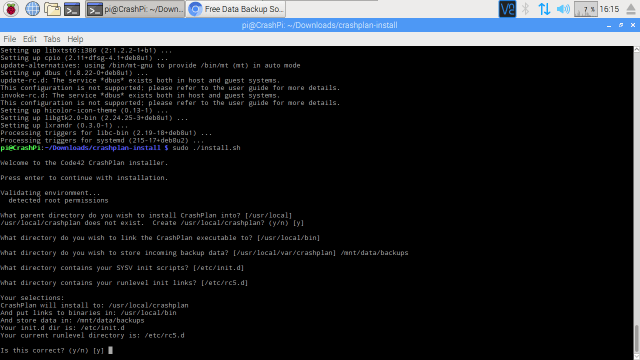
 Return to your terminal window, which should still be emulating an x86 execution environment, and navigate to the new “crashplan-install” folder. From there, run the CrashPlan installation script.
Note: You need to do this from the emulated environment. If you have multiple Terminal windows open, make sure you’re in the right one with the “arch” command again before continuing.
cd ~/Downloads/crashplan-install/
sudo ./install.sh
Just like in the good old days, you should take the default answers for everything except the backup location. Make sure you point that somewhere on your external hard drive where you want the backups to go. In my case, that’s /mnt/data/backups/.
Let the CrashPlan installer complete, and it will ask if you want to run CrashPlan Desktop now. This part won’t work quite right, so answer “no”. There will also be a CrashPlan shortcut on your desktop. It won’t work either, so you may as well delete that. The only shortcut that’s going to work is the one that got created in the start menu, but don’t launch it just yet.
If you’re running this on a fresh Raspberry Pi, or at least one that isn’t trying to run the whole “Home Server” show, you may see a warning about how many files it is configured to watch in real time. We addressed this issue in the MiniDLNA post, but if your Pi isn’t running MiniDLNA, then you most likely didn’t configure the “watches” on it. If you’re only planning to use this machine as a backup destination, and it won’t be backing up its own contents somewhere, then you can ignore this warning, since CrashPlan won’t need to pay attention to local files anyway.
If you want to configure the Pi to watch more files at once, we’ll need to edit the sysctl.conf file. This virtualized environment doesn’t know what nano is though. I’ve gotten used to nano, and I’m sure it will come up again in the future, so I’m going to install it and use it to make the required changes.
sudo apt-get install nano
sudo nano /etc/sysctl.conf
At the bottom of the file, add a line that says
fs.inotify.max_user_watches = 65536
That should do it. Save the file and exit nano (ctrl-x, y, enter). Next, double check that the CrashPlan service is running.
sudo service crashplan status
You should see a sad, grey message that the service is inactive (dead), so I guess the installer didn’t get that part quite right either. It should have set the service up to run automatically though, and we’ll want to check that this is working, so all you should need to do is reboot. You don’t want to issue this command from the emulated command line, though. Either use the desktop menu to reboot the system, or exit the emulated x86 environment first.
exit
sudo reboot
When the system has restarted, get to a plain old terminal window (no need to run exagear again) and check the CrashPlan service.
sudo service crashplan status
It should be a happier green color now. Not only that, but if you read carefully, you’ll even notice the word “exagear” in the path to the service. Even though the service runs in the virtualized x86 environment, it can auto-start and be seen from the native Raspbian environment. Cool, right?
Now that the background CrashPlan service is running, let’s get it configured and attached to your CrashPlan account. Remember, you don’t have to pay for a subscription, but you do need to establish an account. That’s what allows all of your different machines to discover and talk to each other in order to coordinate things.
Start CrashPlan desktop using the main desktop menu, not the shortcut on the desktop, which you should just go ahead and delete if you didn’t do that already. You may want to go grab a snack or a drink or something. CrashPlan desktop is going to take a while to start up. Even in the original post on this topic, before we introduced any kind of emulation into the mix, this step took ages. Now, with the emulated x86 execution environment thrown into the mix, it takes even longer. Just keep looking at the CPU meter in the upper right corner of the desktop. As long as it looks busy, there’s still hope. Mine stayed at 30%-50% for a few minutes before I finally saw the CrashPlan splash screen.
After you’ve waited long enough, or left and come back, you should see the CrashPlan sign-up page.

You can refer back to the original article if you want, but I’ll summarize here. Either start a new account, or sign in to your existing account if you already have one. Given how slow the Pi can be sometimes, I’d establish an account using your desktop computer, and then choose “Existing Account” here, but that’s just me. Either way, there’s going to be another very long delay, so be prepared to wait a little while. Keep your eye on the CPU meter again if you want assurance that the system hasn’t gone to sleep.
In fact, just about everything having to do with the CrashPlan UI is going to be incredibly slow on the Pi. You’ll just have to get used to that. Fortunately, once CrashPlan is up and running, you won’t need the desktop application very often. When the sign-in page finally goes away, you should be able to set up backups, listen for incoming backups from other computers, and all the other things you’re used to.
So far, I’ve noticed that after rebooting the Pi, it isn’t always noticed right away on the network. I’ve had to reboot my main computer before it has picked up on the CrashPi being available, but maybe I just wasn’t being patient enough.
Please make sure you give this a test drive using a trial installation before plunking down money on a license. I have not quite figured out the magic to getting the system to be totally stable yet. Sometimes kicking off the desktop application seems to wake things up, but not always. I imagine the CrashPlan engine just has a lot of housekeeping to do on startup, and it’s just not ready to listen for connections for a while after a reboot. The testing is continuing on this end.
I’ll be updating this post as time goes by to review how well the system is performing over time. Keep watching.
Update 1: It’s only been a few hours, and the CrashPi disappeared on me. The processes seems to have stopped, so I rebooted the Pi, but not before making some tweaks. I overclocked the Pi (Model 2B) to 1000mhz, and reduced the GPU memory to 16. That should free up some resources, I hope. Things may run better on a Pi 3. I’ll be experimenting with that in the near future. Also, this particular Pi does not boot from the hard drive, which means that its swap file is still on the SD card. I’ll be moving things to the hard drive next to see if that helps.
Update 2: A few more hours, and I’m already wishing I hadn’t posted this so early. Initial tests looked good. It was slow to start, but it worked. After leaving it running for a few hours, I’m very disappointed with the stability, at least on the Pi 2. I’ve moved the SD card to a Pi 3 to see if it makes any difference, and so far it’s looking pretty good. Things seem to start up a bit faster. One thing to note is that the engine still takes some time to get up and running, so there’s still a good five to ten minutes after rebooting when the desktop application will keep complaining that it can’t reach the backup engine. Give it some time, tell it to retry, and eventually it will connect. On the Pi 3, my backup is running once again, so it may just be that the Pi 3 is the minimum viable configuration. Since I simply moved the card from one machine to the other, it’s not actually running the right version of ExaGear though. There is a separate version for the Pi 3, which may perform even better. I’ll be looking into upgrading that as soon as my backup has completed. I’m a bit out of date, and safety comes first.
Update 3: Everything was going pretty well. Then I walked away to go do some stuff around the house, came back, and it was all gone again. The CrashPlan service was “active (exited)”, So I restarted the service (sudo service crashplan restart), and waited to see if the backup would resume on its own. 10 minutes went by with no connection, so I started the desktop application to see what was going on. 20 minutes later, still no connection, but the service is still up and running, and the desktop application on the Pi says it’s listening for inbound connections. I’m going to try something I wasn’t really expecting, but would not surprise me. I’m trying a better power supply next. Maybe it’s something simple like that. This Pi happens to have a screen on it (the official 7″ screen), and maybe that’s pulling more power than this supply would like. I have seen the lightning bolt in the corner, after all. But first, another round of update/upgrade just in case the move to the Pi 3 requires an update to ExaGear.
Update 4: Everything was going so well. And then it wasn’t. Rebooting both my laptop and the Pi doesn’t get me anywhere. They just don’t seem to want to talk anymore. I’ve changed to a beefier power supply, tried to update/upgrade everything, and there’s just nothing happening. The next thing to try is to boot from the hard drive and increase the size of the swap file. That may free up enough resources, and stop hammering my SD card long enough to get somewhere. That may happen tomorrow. I’ll post about it when it happens.
Update 5: I went ahead and changed it to boot from the hard drive tonight, and expanded the swap file to 2GB. It didn’t look like it had any effect, but once again, after sitting there for a good long time, it was suddenly ready to communicate. It’s been up for 18 minutes straight so far, backing up my stuff. I’m trying not to jinx it, but maybe it might work after all. Not very fast, and not always when you’re watching, but eventually, silently in the background, it might just back some stuff up.
Update 6: Well, that’s it for this weekend. Up next is a clean install following Eltech’s instructions to the letter. Maybe it’ll make a difference. We’ll find out later this week, assuming I find the free time.
Update 7: It took a little longer to make some sort of reportable progress than I’d hoped. There’s a new version of ExaGear desktop out, and supposedly people have had greater success using v2.2 than previous versions. I thought I’d give it a try, and last night I updated the version on the CrashPi to 2.2. It does seem to work better, but it’s still not what I’d call stable. I was able to get CrashPlan working again, and left it going overnight. This morning, the service was still up and running this morning, but the desktop application had died. When I restart it, it says “Unable to connect to the backup engine, retry?”, even though the service still seems to be running.
I have rebooted the CrashPi, and after giving it plenty of time to settle, eventually got the desktop application to connect. It looks like the backup of the CrashPi itself completed, so I’m going to try reconfiguring the CrashPi to boot to the command line in order to conserve resources, and try using it as a backup destination for another computer with more stuff on it.

Hi. Without having read your post I’ve been trying the exact same thing, on a Raspberry Pi 2b. I get very much the same results (with the Pi as a backup destination.) Setup is fine, the engine then runs for a variable amount of time (generally between 1 and 3 hours) then crashes and is unresponsive. Restarting the service doesn’t help; at that point the only way forward is to reboot the Pi, wait a while, then tapping ‘Retry’ on the remote client and waiting for a little more time. It then comes back and runs for a while longer before crashing again. Some of the crashes result in Java providing crash logs called hs_err_*.log saved in the Exagear guest image at /usr/local/crashplan – I’ve tried sending these to the Exagear support folks, so fingers crossed…
Exagear support have been good. There’s a new version (2.2) which seems a lot more stable; Crashplan still does crash sometimes, but has been running for as long as a day between crashes – plus you no longer need to restart the Pi when it does crash, can simply restart the Crashplan service.
It was very interesting to read your findings about crashplan on the Pi, did you investigate further and is it useable without having to pull strings too often.
I too have requested ARM build of libc42archive, but don’t have too high hopes.
Currently I have crashplan running on an old 32 bit Linux mint machine but would love to move to the Pi3.
It looks like the only thing that’s working for anyone is to install an old version and symlink the update directory to dev/null. I have not found any other solution yet. I had high hopes that exagear was going to be the solution, but it looks like that’s a no.
Mel, Please explain your temporary fix. I’m new to this thread and I’m struggling with the same issue.
If you’re referring to my temporary fix for doing backups at all, then look at the https://melgrubb.com/2016/12/11/rphs-v2-crashplanless/ post. Basically, it’s not installing CrashPlan on the Pi at all, and just using the Pi as a network share location for your main computer to put IT’s backups. It doesn’t offer any way for the Pi to back its own stuff up though, so it’s a very incomplete solution.
Mel, thanks for the quick reply. It looks (So Far) that the fs.inotify.max_user_watches = 65536
Has made my installation MUCH more stable on my Rpi3. It’s been running most of the day(8+ hours) without issues. I will keep an eye on it and report back.
in my case, Crashplan works only for less than 4 hours then crashes. I contacted Exagear support they said there’re working on it but for now they don’t why it crashes. any update from you guys?
Not really. I’ve gotten more than four hours out of it, but it’s still not trustworthy. It’s nice that they’re paying attention to it though.
Same here. Exagear say they’re still working on it. I set a cron job to manually restart the Crashplan service every morning at 6am, so max outage is half a day which is fine for me (though obvs would be better if it was fully reliable!)
Mel, did you read that CrashPlan is getting rid of the Personal versions? I have Duplicati.com running. It is open source, the client works much like CrashPlan. You can select many different BU targets. I am targeting my Pi, via SFTP & my hosting provider with unlimited storage via webdav. Wonder how long till my hosting co ratchets back the “Unlimited” storage & bandwidth.