
Important: This post is part of a series. Each post builds on the previous ones. If you are trying to add just one thing to an existing system that was not built by following this series in order then I cannot promise that these instructions will work for you. In most cases they will, though. Please refer to the Introduction for a list of all the different posts in the series.
Self-Promotion: I have recorded this series as a screencast for Pluralsight:
(http://www.pluralsight.com/courses/raspberry-pi-home-server)
If you have a Pluralsight subscription, please consider watching it. Reading the instructions is one thing, but actually watching it being done demystifies the whole process.
Thank you!
Now that the Raspberry Pi is on the network, and sitting on top of a (hopefully) massive pile of your media on its external drive, it would be nice to have it share that media in a form other than simple file shares. File shares are great for a lot of things, but Media can be done a little better.
DLNA (Digital Living Network Alliance… what a horrible acronym) is the technology standard that lets you play songs from your phone and have them come out of the stereo in your living room. It’s not ubiquitous yet, but it’s catching on. It also lets programs like Windows Media Player play music and video “libraries” that are being shared by other computers on the network.
The Raspberry Pi is about to become one of those libraries.
Note: It is also possible for a Raspberry Pi 2 or above to run Plex Media Server, which is a nicer experience overall, but as of the time of this writing, still doesn’t get along with Windows Media Player. WMP will see a Plex server, but can’t seem to play any media off of it. A walkthrough of installing and configuring Plex Media Server is included in my Pluralsight course, but I’m not including it in the blog just yet because of the compatibility issues with WMP, and because MiniDLNA is a smaller, leaner package which I think works a bit better on the Raspberry Pi. I’ll be adding a separate post about Plex Media Server later on, at which time I’ll revise this note.
Installing MiniDLNA
This installation will be done from the command line, and involves a bit more configuration than some of the other features in this series. Get yourself logged in to a command line as “pi”, and start by installing MiniDLNA. The version in the repositories isnt always totally up to date, but it has worked well for me so far.
sudo apt-get install minidlna
As installs go, this one’s pretty quick, but there is a bit of configuration to be done before it’s ready to go. Start by editing the MiniDLNA defaults:
sudo nano /etc/default/minidlna
Find the line that says “#USER=”minidlna””, and remove the pound sign / hash mark from the beginning, so that if just says “USER=”minidlna””. Do the same for the “GROUP=” line right below it. Close and save the file (ctrl-x,y,enter).
Next, edit the main MiniDLNA configuration file.
sudo nano /etc/minidlna.conf
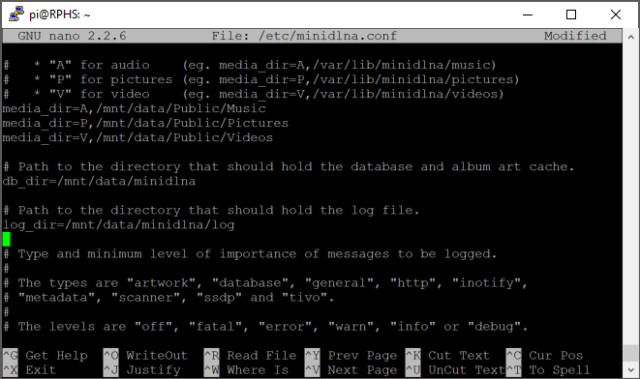
There are several things to be done here. The first is to set up the folders that will hold the various kinds of media you want shared. A little way down the file, find the first line that isn’t a comment. It should say something like “media_dir=/var/lib/minidlna”. On my drive, there are separate folders for Music, Pictures, and Videos, so I’ll add multiple media_dir lines, one for each kind of media. The comments in the file do a pretty good job explaining the syntax, but for reference, here’s what mine says:
media_dir=A,/mnt/data/public/Music
media_dir=P,/mnt/data/public/Pictures
media_dir=V,/mnt/data/public/Videos
Note that the paths are case sensitive, so while my “Public” share is capitalized, the actual folder is not. The folders within my public folder are, however. This is more for demonstration purposes than anything. Feel free to capitalize your folders however you like.
The letters A, P, and V indicate what kind of content each folder contains (audio, pictures, or video). Next, change the database and log folders to go to the data partition as well. This will conserve space on the relatively small OS partition. The lines to configure this are just below the media_dir lines modified above. Remove the pound signs, and change the folder paths:
db_dir=/mnt/data/MiniDLNA
log_dir=/mnt/data/MiniDLNA/log
The result should look something like this:
Further down the file, uncomment the two settings “inotify” and “notify_interval”. This will allow MiniDLNA to update its database approximately every fifteen minutes with new or updated files.
Close and save the file (ctrl-x,y,enter).
If you were to start MiniDLNA and check its logs right now, you would find that it complains that the number of “watches” is too low. This is how many folders and files it can be watching for changes at a time, and currently its default value is too low in its opinion. It will probably work just fine as is, but we can shut the error up easily enough before continuing. Edit the sysctl.conf file.
sudo nano /etc/sysctl.conf
At the bottom of the file, add a line that says
fs.inotify.max_user_watches = 65536
This is the smallest number that MiniDLNA won’t complain about. Close and save the file.
Next, you need to set up MiniDLNA to run automatically at boot time.
sudo update-rc.d minidlna defaults
And finally, reboot the Pi to take both of these changes into account.
sudo reboot
When everything has restarted, you should have a working MiniDLNA installation, with no complaints in the log file.
Warning: Depending on the size of your media collection, it may take the poor little Raspberry Pi quite a while to index everything (mine took almost two days). If you look at your CPU usage, you’ll see that it stays pretty much pegged for as long as it takes. Don’t worry, you haven’t reached the Pi’s limit, at least not permanently. When it has finished indexing, you’ll see its usage drop back to almost nothing.
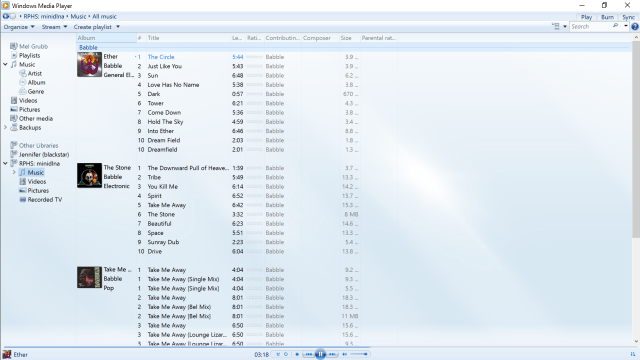
You should now be able to open something like Windows Media Player, and see an entry for “RPHS: minidlna” in the list on the left. Drilling down into this entry will show you the media that has been indexed so far.
I am not a MiniDLNA expert, by any means, so you might want to look elsewhere for more configuration information. Also, MiniDLNA has recently changed names to become “ReadyMedia”, but the Raspberry Pi version still calls itself “MiniDLNA”, at least for now.
Forcing a re-scan
As commenter Ivelin Tenev points out, MiniDLNA may not notice files that you add when it’s not running. If you have disconnected your data drive from the Pi, loaded files on it, and then re-connected it, MiniDLNA may not notice the new files because it wasn’t “watching” at the time the files were added. You can force a re-scan by typing:
sudo minidlna -R
and then restart the minidlna service like this
sudo service minidlna restart
What’s next?
In the next post, we’ll add an OpenVPN server, allowing you to securely connect to your home network when you’re away.

First, I would like to thank you for the excellent guide! It helped me configure my home server in no time.
I am using an external USB drive as data storage which I attached to my laptop to transfer media files faster. After attaching it back to the server, I noticed that miniDLNA does not show the new files on the drive.
It turned out that since miniDLNA uses the inotify kernel feature, the service will detect the new files only if the drive is attached to the server and the service is running at the time the files are copied, which was not in my case.
To workaround this, I had to force a rescan with the following commands:
$ sudo minidlna -R
$ sudo service minidlna restart
Regards,
Ivelin Tenev
Let me review the blog post, but minidlna should still be scanning periodically. The interval can be set in the config file. That might be disabled by default now, but I don’t think it was before.
I have updated the post, and added a “Forcing a re-scan” section at the bottom. Thank you for sharing this.
Great tutorials.
Check : sudo service minidlan restart
minidlna ? not minidlan 🙂
The post has been updated. Thanks for pointing that out.
I have taken your pluralsight class and read your blogs. Excellent work!
I’m hoping to update the course this year. It’s amazing how quickly it got out of date on me. I did get to go in last year and put in a bunch of text overlays with updates, but a full refresh is probably in order at this point.
Nice article and comments, thanks!
It seems that minidlna and/or inotify on raspbian are not friends. I have fighting against this issue since the RPi 1. No matter if the media storage is attached directly (ext4, ntfs…) to the server or not. I have tried several things, even using the SD card as storage (not recommended), without any success. I don’t like re-scan the whole library, but that’s the only way I got to have new media available.
Did you increase the number of watchers? I’ll have to verify on my own server, but I’m pretty sure mine has caught on to newly arrived files, or at least it did in the past.
I’m now using rsync to get my media from a samba server to the minidlna machine and it seems to be working now. I believe it was something related with permissions avoiding the media to be automatically update.
Hi Mel, thank you so much for your article! It is extremely well done! I have added a lot of media while the drive was no plugged into the PI serve, so I tried the command sudo minidlna -R and I get the error command not found. After googling, I tried the comment sudo minidlnad -R, but then I get the error minidlna.c:594: error: Media direct “…” not accessible. Do you have any suggestions to resolve this issue?
Thank you so much for this article! It is really well done! I tried to force the rescan with sudo -minidlna -R and got command not found. After googling, I tried sudo -minidlnad -R, which then gave me the error minidlna.c:594: Media directory “…” no accessible. Do you have any suggestions to resolve this issue?
Well, the second command certainly seems to have done more. At least it’s complaining about not finding the media directory. You know you talked to something at least. That’s a start. I’d double check the configuration, and make sure that the media has mounted successfully in the same place. Can you browse it from the command line?
Of course this was all due to an extra space in the directory names…don’t you love it when that happens? Thank you so much for the quick reply!
I’m glad it turned out to be something simple and not a systemic problem that was going to bring down everybody’s systems. Whew.
Pingback: Streaming music from Raspberry Pi – Technical Notes