
Over the course of this series, I’ve shown you several different ways to access your Raspberry Pi Home Server remotely. We’ve looked at OpenVPN, for connecting to your home network, RealVNC for opening a remote desktop session, and SSH for opening a remote terminal window. The first two options have worked whether you are on the same network at the time or not, but the last option only works when you’re at home, or already connected through VPN, at least so far.
In this post, I’m going to punch a hole in my router’s firewall to allow external SSH access to my server. I am doing this to support some other tools that I’ll discuss in future posts, but for now, I’m just going to get basic external SSH access up and running. If you’ve enabled SSH on your Pi, and can already connect to it over the local network, then all that’s required is to open up your router’s admin page, and map a port from the outside to port 22 on the Pi.
There, that was simple. It’s also asking for trouble. If your pi user’s password is nice and strong, then it’s not asking for a lot of trouble, but there’s always the possibility that someone’s going to come knocking and try to brute-force their way into your Pi, and therefore your network.
My first piece of advice would be to NOT simply map port 22 on the outside world to port 22 on the Pi. That’s the first thing a hacker’s going to try. The second thing they’ll try is port 222, then port 2222 and so on. Let’s not make it TOO easy, right? Apart from security concerns, there’s also the simpler problem that you can only map each external port on the router to a single device on the local network, so if you have multiple devices that you’d like to connect to using the same protocol, they can’t all use the same port. You’ll need some way to tell them apart.
For this example, I’m going to go with a simple convention of one or two digits to identify the device I want to connect to, and three digits for the port. If my server’s internal IP address is 192.168.1.5, and I want to talk to port 22 (SSH), then my external address might be 5022. A different server, at 192.168.1.15 would use 15022 for the external SSH port. Get it? This also means that I can remember which port goes to which computer easier. This starts to fall apart for higher-numbered ports, since port numbers only go up to 65535, so you might need to abbreviate things later on, but let’s at least start with something vaguely mnemonic.
That’s some basic security through obscurity, but we can do much better than that. Odds are, you’re using a fairly basic password for your pi account. Maybe you’ve added some special characters and some capitalization to strengthen things a bit, but you need to ask yourself “Is this password strong enough to protect all my stuff from evil?”. If you’re not totally confident in your password’s strength, then it’s time to take it to the next level.
Rather than using passwords to secure SSH access, lets set up public/private key-based authentication instead. You can think of a public/private key pair as kind of like a super-password. The private key is a way of asserting your identity, and the public key is a way of verifying that assertion. The private key is way more complex than you could ever hope to remember, and certainly more than anyone using current technology could brute-force their way through within our lifetimes.
You may have used keys such as this already in order to connect with systems like GitHub. If you have already generated a key, then you can skip this step and use the keys you already have. There’s no reason you can’t use the same key pair for any number of different services.
Check your home directory for a hidden subdirectory called “.ssh”. For Linux users, this will be at “~/.ssh”, for Windows users, it will be at “C:\Users\USERNAME\.ssh”. If there are already files in that directory called “id_rsa” and “id_rsa.pub”, then you already have a key pair. If you’re missing just the public key, then keep reading. The public key is easily recreated, and we’ll get to that in just a minute.
Generate a key pair
Assuming you don’t already have a key pair on the device you want to connect from (the client, not the server), you’ll need to generate one. For Windows users (like me), this will be very different than it is for other operating systems. I’ll start with the command line instructions for Mac and Linux users first.
Mac & Linux Users
All Mac and Linux users need is one command.
ssh-keygen
The tool should prompt you for everything you need. You can accept the default for the filename, which will be id_rsa, and stored in your home folder, under a “.ssh” directory. You’ll also be prompted for a passphrase. This is optional, but assigning a passphrase means that even if someone got access to your computer, they still wouldn’t be able to SSH into your server without knowing that passphrase. This is your choice, and I won’t judge you if you leave it blank. You should now have two files in ~/.ssh directory called “id_rsa” and “id_rsa.pub”. That’s it, you’re done. Skip ahead to “Installing the public key”
Windows Users
For Windows users, I’m assuming you’ve already installed PuTTY, since I’ve used it for this entire series so far. If not, go install that now. It’s not the prettiest website in the world, but the tool is the de-facto standard for SSH in the Windows world, although I hear true OpenSSH is on the way for Windows users. We’ll need the “puttygen” tool that gets installed along with PuTTY. You can simply press the Windows key, and type “puttygen” to run it. The program looks like this:

Press the Generate button, and move the mouse around in the blank area until the key is generated. When it’s complete, it will look something like this:

The public key is in plain text format in that central textbox. It’s also conveniently highlighted, so you can simply right-click it and copy it to your clipboard. We’ll need it in just a minute.
Press the “Save private key” button, and save this file to the .ssh folder under your home directory (e.g. C:\Users\Mel\.ssh). Create the folder if it doesn’t exist already, and call the file “id_rsa” by convention.
Missing .pub file?
If, for some reason, you have a private key file (id_rsa), but you don’t have the matching public key file, then there’s an easy fix. Remember that the public key is just a way of validating the private key. All the information needed to generate a public key is contained in the private key. For Mac and Linux users, you can recreate the public key file like this:
ssh-keygen -y -f ~/.ssh/id_rsa > ~/.ssh/id_rsa.pub
For Windows users, click the “Load” button in PuttyGen, and load up the id_rsa file. The rest of the UI will fill in, and you can right-click in the public key text box, and “select all”, then right-click again and copy it to the clipboard. You can also save the public key into a file, but it won’t be in the right format for the Pi to consume. What you really need is right there in that textbox, so just copy it to the clipboard.
Installing the public key
Next, you’ll need to install the public key onto the Pi, which will allow the Pi to validate the private key when it sees it. You do this by tacking it on to the end of a file that may not exist yet. Remote into the Pi either through SSH or VNC, get to a command line, and edit the authorized_keys file.
sudo nano /home/pi/.ssh/authorized_keys
Windows users can just paste in the public key we copied to the clipboard above. Mac and Linux users will need to get its contents from the id_rsa.pub file we generated earlier. Copy its entire contents to your clipboard on the client computer where you generated it, and then paste it into the nano editor on the Pi. Close and save the file.
For Mac and Linux users, this is all you should need. Windows users will need to install the new private key into PuTTY itself. Load up an existing profile, or create a new one with the internal IP address of the server, expand the “SSH” section on the left, and then click on the “Auth” node.
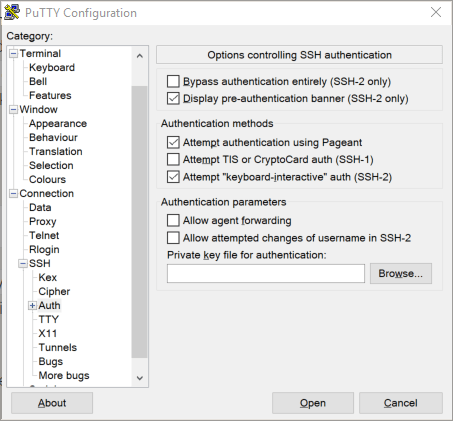 Click the “Browse” button, and then go find the id_rsa file in your .ssh folder. Scroll the left-hand section back up to the top, and click on Session. Give the new session a name, and save it. If you loaded an existing session, then clicking Save will update it. Either way, PuTTY should remember the private key now. Click “Open”, and you should get a login prompt as usual, but after you enter the username, you won’t be prompted for a password. That’s it. You’re authenticating using keys.
Locking it down
We’ve laid the groundwork for securely accessing your Pi from outside your own network now, but it’s still possible to log in using a plain name and password. If you were to SSH to your server from a different computer (or PuTTY profile), it would just go on asking for a name and password like it always has. We’ve made logging in more convenient if you have a key, but we’re not yet requiring a key. We need to turn off password-based authentication next.
Edit the SSH configuration file
sudo nano /etc/ssh/sshd.conf
If the file appears blank, try using the filename “sshd_config” instead. I’m not sure when the naming change occurred, but I’ve seen it both ways. If your server is older, it may be using the other name.
Scroll through the file, and look for the following values (or use ctrl-w to search for them), and set them accordingly.
PermitRootLogin no
PubKeyAuthentication yes
AuthorizedKeysFile .ssh/authorized_keys
PasswordAuthentication no
ChallengeResponseAuthentication no
UsePAM no
If this is the first time you’ve edited this file, then some of these lines may be commented out. Remove the pound sign from the beginning of a line to uncomment it. Finally, restart the SSH service to enable the changes.
sudo service ssh reload
All that’s left is to map that external port if you haven’t already, and you’re ready to connect from the outside world. Windows users will need to make a new PuTTY profile with the key and using the external IP address of your home network, rather than the internal address of the server. Unless you have a static IP address at home, you’ll need some kind of dynamic IP service such as no-ip.org, which I covered in the OpenVPN post.
